Advertisement
Home Improvement 3m read
0

A Fast Fix for Stripped Screws

Stymied by stripped screws and fishing for a fast fix? Well, we’re here to offer a whole lot more than just whimsical alliteration. Stripped screws are a headache to remove, as a screwdriver alone lacks sufficient traction. Thankfully, a rubber band can change all that, helping you remove stripped screws with ease.

All featured products and deals are selected independently and objectively by the author. House Outlook may receive a share of sales via affiliate links in content.

Stymied by stripped screws and fishing for a fast fix? Well, we’re here to offer a whole lot more than just whimsical alliteration. Stripped screws are a headache to remove, as a screwdriver alone lacks sufficient traction. Thankfully, a rubber band can change all that, helping you remove stripped screws with ease.

Why Do Screws Get Stripped?

Before diving into this hack, it’s worth knowing what stripped screws are and why they happen. A stripped screw is one on which the head’s slots are worn down, making it nearly impossible for you to insert a screwdriver and maintain a tight grip.

Related: How To Choose the Right Size Drill Bit Every Time

Stripped screws happen, in part, because of the low-quality metals used to make many cheap screws. These screws wear down easily if you apply too much force, especially when using a power drill. Once a screw gets stripped, it’s not a huge deal so long as you leave it there. But trying to remove it is a far more challenging ordeal.

Advertisement

Rubber Band, You’re the One

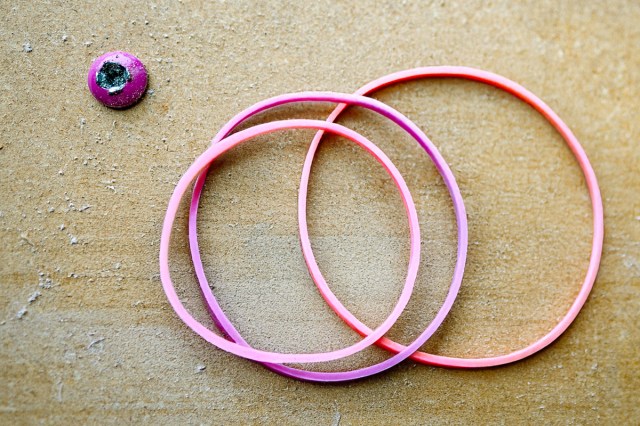
To get rid of a stripped screw, all you’ll need is a wide rubber band that covers the width of the head, plus a screwdriver that would normally fit the screw. Place the rubber band flat against the screw head before firmly pressing the screwdriver against the rubber and into the damaged slots. Turn the screwdriver counterclockwise, and after a few twists, you should notice the screw start to loosen and eventually pop out.

The logic behind this trick has to do with the extra traction a rubber band provides. While the original slots of the screw head may be worn out, the rubber band fills every available crevice, creating a new, firmer surface for the screwdriver to grip. This provides the additional traction needed to remove the stripped screw.

How To Prevent Stripped Screws

Now that you’ve removed that pesky stripped screw, here are some helpful tips you can use to reduce the likelihood of it happening again. First, always use a screwdriver that fits, rather than one that’s too big or small; an improperly sized tool can easily slide out and damage the screw head. Hold the screwdriver straight rather than at an angle, as the latter increases the risk of slippage and damage. Lastly, apply downward pressure before ever twisting the screw, or you’ll cause the screwdriver to come loose.

Advertisement
Bennett Kleinman
Staff Writer
Bennett Kleinman is a New York City-based staff writer for Optimism Media, covering topics for several brands including House Outlook and Better Report. He previously contributed to television programs such as "Late Show With David Letterman" and "Impractical Jokers," and digital publications like The Onion. Bennett is also a devoted New York Yankees and New Jersey Devils fan, and thinks plain seltzer is the best drink ever invented.
This article is for general informational purposes only.
Affiliate Disclaimer 
|
Financial Disclaimer
Featured Image Credit:  Lost_in_the_Midwest/ Shutterstock | Updated  Feb 25, 2025 |
Advertisement
Gardening 3m read
0

This Is the Best Way To Dust Delicate Plant Leaves

Just like the novels and knickknacks on your bookshelves, houseplants collect dust over time. This dust not only may be harmful to your health — especially if you have respiratory issues, allergies, or asthma — but also impacts your plant’s vitality.

All featured products and deals are selected independently and objectively by the author. House Outlook may receive a share of sales via affiliate links in content.

Just like the novels and knickknacks on your bookshelves, houseplants collect dust over time. This dust not only may be harmful to your health — especially if you have respiratory issues, allergies, or asthma — but also impacts your plant’s vitality.

Unfortunately, dusting plant leaves isn’t as easy as taking your feather duster to the affected areas. This can cause the particles to go everywhere and potentially damage the delicate leaves if you aren’t careful. And wiping them down with a damp paper towel is both tedious and wasteful. Instead, the best tool for dusting plant leaves might be hiding in your dresser drawer.

Why Do You Need To Dust Plants?

Getting rid of the dust that accumulates on top of your plant’s leaves can create a better environment for your houseplants to thrive. Dust gets in the way of plants’ ability to absorb sunlight, hindering photosynthesis, and consequently, nutrient production. Keeping the leaves clean helps ensure they get the nutrients they need to thrive.

Advertisement

The Best Way To Remove Dust From Plant Leaves

Fuzzy socks — you know, those plush, microfiber pairs that keep your feet toasty in the cold — can be an effective way to remove dust from plant leaves. Just slip a fuzzy sock over your hand and gently wipe away the dust buildup. The particles get trapped between the sock’s tiny fibers, and the material is soft and gentle on the leaves, so you don’t have to worry about damage. You can also opt for cheap microfiber dusting gloves, which allow you to get into all the nooks and crannies.

Related: Bobby Pins Are the Secret to Fuller, Healthier Houseplants

To cut down on how often you need to dust, you can spritz your houseplants with a dust-repellent solution. In a spray bottle, combine 1 quart of water with 1 teaspoon of neem oil and a few drops of liquid dish soap, then shake it up. Spraying this solution onto the leaves not only keeps them clean (the oily residue makes it harder for dust to hang on), but also doubles as a pest repellent since neem oil is a contact insecticide that can kill pests instantly.

Advertisement
Jessie Quinn
Writer
Jessie Quinn is a Los Angeles-based lifestyle journalist with words published in PEOPLE, StyleCaster, Apartment Therapy, The Spruce, Byrdie, and more. She has a Bachelor's Degree in fashion journalism from Academy of Art University and her work spans across many categories, including style, beauty, home, health, crafts, and more.
This article is for general informational purposes only.
Affiliate Disclaimer 
|
Financial Disclaimer
Featured Image Credit:  Liudmila Chernetska/ iStock | Updated  Feb 25, 2025 |
Advertisement
Food & Drink 3m read
0

The Hard-Boiled Egg Peeling Hack That’s Better Than All the Rest

Keeping hard-boiled eggs in the fridge is one of the best ways to ensure you’ll always have a protein-rich snack on hand. Boiling hard-boiled eggs is easy, but peeling them can be a pain, especially if you have sensitive fingertips or mobility issues in your hands. Looking for an easy way to get those eggs peeled in just a matter of seconds? Check out this helpful hack that promises peeled eggs with little mess or hassle.

All featured products and deals are selected independently and objectively by the author. House Outlook may receive a share of sales via affiliate links in content.

Keeping hard-boiled eggs in the fridge is one of the best ways to ensure you’ll always have a protein-rich snack on hand. Boiling hard-boiled eggs is easy, but peeling them can be a pain, especially if you have sensitive fingertips or mobility issues in your hands. Looking for an easy way to get those eggs…

How To Peel a Hard-Boiled Egg

The only item you need to peel hard-boiled eggs in under 30 seconds is a clear Mason jar. If you don’t already have one, you can find endless options online or at your local thrift store. We recommend using a clear jar so you can see when the eggs are fully peeled. 

Now comes the fun part: Fill the Mason jar halfway with water, then use a spoon to gently drop your hard-boiled egg inside. Secure the lid tightly, give the jar a good shake, and watch as the shell chips away. You want to shake it hard enough to crack those shells, but not so hard that the egg explodes.

Related: How To Peel Potatoes Effortlessly When You Don’t Have a Peeler

When most of the shell has been removed — this should take around 10 seconds or so — retrieve the egg with your spoon. You may need to use your fingers to remove any remaining bits of shell, but they should slide right off. You can now enjoy perfectly peeled hard-boiled eggs, without worrying about dropping one into the trash can mid-peel (we’ve all been there).

Advertisement

Practical Tips To Make Egg-Peeling Easier

If you don’t have a Mason jar at your disposal, you can try any of these quick and easy tips to make peeling the old-fashioned way a little easier. The first thing we recommend is to cool your freshly boiled eggs in a bath of ice water. This will not only prevent your eggs from overcooking, but also help separate the egg white from the shell, resulting in larger chips and an easier peel.

You can also try adding a little distilled white vinegar (about 2 teaspoons) to the water while you’re boiling the eggs, which could help dissolve the hard outer layer of the shell and separate the egg white from the shell membrane.

Advertisement
Krissy Howard
Writer
Krissy Howard is a New Mexico-based writer. Her work has appeared in Byrdie, Hunker, and Simplemost, and she is the former managing editor of music satire website, The Hard Times.
This article is for general informational purposes only.
Affiliate Disclaimer 
|
Financial Disclaimer
Featured Image Credit:  Nebasin/ iStock | Updated  Feb 25, 2025 |
Advertisement
Cleaning 2m read
0

Tired of Dingy Socks? This Hack Will Whiten Them

Much like death and taxes, owning a pair of white tube socks is inevitable. Although they’re not the most stylish accessories, they’re surprisingly versatile — perhaps you sport a pair with your Chelsea boots or rely on them for heatless curls.

All featured products and deals are selected independently and objectively by the author. House Outlook may receive a share of sales via affiliate links in content.

Much like death and taxes, owning a pair of white tube socks is inevitable. Although they’re not the most stylish accessories, they’re surprisingly versatile — perhaps you sport a pair with your Chelsea boots or rely on them for heatless curls.

The one major downside is that white socks, regardless of the style, easily show sweat and dirt and become dingy over time. But there’s no need to throw them out and buy a new pair because we have a hack to help you whiten even the yellowest pair of old socks.

What You’ll Need

Large bucket

Powdered laundry detergent

Dish soap

Sodium percarbonate (e.g., OxiClean)

Boiling water

Advertisement

How To Whiten Your Socks

Place your dirty socks in a large bucket, or any other basin you have on hand. Then add a small squirt of dish soap — “small” being the key word. (Too much will result in excess foam.) Next, cover the socks with boiling water, and add one scoop (or about 2 tablespoons) each of powdered laundry detergent and OxiClean. Stir the mixture together and let it sit for at least an hour, though preferably overnight. The final step is to remove the socks, place them in the washing machine, and launder them as normal. Once the laundry cycle is complete, your socks should look as white and fresh as they did the day you bought them.

What About White Shirts?

While we wouldn’t advise this method for delicates, it can be used for white undershirts that have developed yellowing collars or unsightly pit stains. While it may take a few attempts, it’s the perfect solution for refreshing any durable, white undergarments.

So don’t feel blue just because your clothing has turned yellow. With this helpful hack, you can make your socks and shirts last longer without feeling embarrassed about how dingy they may look.

Advertisement
Bennett Kleinman
Staff Writer
Bennett Kleinman is a New York City-based staff writer for Optimism Media, covering topics for several brands including House Outlook and Better Report. He previously contributed to television programs such as "Late Show With David Letterman" and "Impractical Jokers," and digital publications like The Onion. Bennett is also a devoted New York Yankees and New Jersey Devils fan, and thinks plain seltzer is the best drink ever invented.
This article is for general informational purposes only.
Affiliate Disclaimer 
|
Financial Disclaimer
Featured Image Credit:  S847/ iStock | Updated  Feb 24, 2025 |
Advertisement
Organizing 3m read
0

Why You Should Keep a Dry Erase Marker in Your Laundry Room

When you think of laundry room essentials, items such as laundry detergent, wool dryer balls, hampers, and fabric softener probably come to mind. But an item missing from that list can completely upgrade the way you do laundry, and it’s probably one of the last things you’d expect. Dry erase markers may take you back to your school days, but they’re surprisingly useful in a laundry room, particularly for multiperson households.

All featured products and deals are selected independently and objectively by the author. House Outlook may receive a share of sales via affiliate links in content.

When you think of laundry room essentials, items such as laundry detergent, wool dryer balls, hampers, and fabric softener probably come to mind. But an item missing from that list can completely upgrade the way you do laundry, and it’s probably one of the last things you’d expect. Dry erase markers may take you back…

So, how do you make the most of a dry erase marker in the laundry room? By treating the washing machine like your very own dry erase board. Most washing machine lids have an enamel finish similar to whiteboards, making them perfect for writing down important laundry reminders. Dry erase markers are generally safe to use on nonporous surfaces, including metals, porcelain, melamine, and glass, but we recommend testing a small area first.

Related: Why Throwing a Tennis Ball in the Dryer Is the Ultimate Laundry Hack

It’s also easy to remove the marker with a damp paper towel or microfiber cloth when the laundry is done. (If you’re worried about smudges, keep a spray bottle filled with a cleaning solution of one part isopropyl alcohol to three parts water.) Still need convincing? Here’s how a dry erase marker can ease some common laundry day headaches.

Advertisement

Jot Down Laundry Notes

When it comes to laundry, there’s nothing worse than accidentally shrinking your favorite sweater or tossing a “dry clean only” item in the dryer. A garment’s care instructions might call for cold water instead of hot, the delicate cycle, or air drying. In any case, you can write those reminders on your washing machine lid so you, or others in your household, don’t forget them.

Plan Your Laundry Days

Creating a laundry schedule is a total game changer, especially when you live with multiple people. Whether you have a partner, kids, or roommates, a well-planned schedule can make laundry days run more smoothly. Designate laundry days for each person or specific items you need to wash, such as delicates and bedding. You can even take it one step further by color-coding your schedule with different dry erase markers.

If this is a hack you’re eager to try, here’s a tip to keep in mind when shopping for this underrated laundry room essential. Dry erase markers with magnets on them are especially useful, as you can stick them to the washing machine to keep them organized and within arm’s reach.

Advertisement
Pauline Lacsamana
Writer
Pauline Lacsamana is a freelance writer and editor who specializes in commerce, home, design, and lifestyle. She has bylines in The Spruce, Business Insider, U.S. News & World Report, Hunker, MyDomaine, Parade, and more.
This article is for general informational purposes only.
Affiliate Disclaimer 
|
Financial Disclaimer
Featured Image Credit:  LightField Studios/ Shutterstock | Updated  Feb 24, 2025 |
Advertisement
Decorating 3m read
0

This Paint Finish Promotes Better Sleep

Your bedroom should be an oasis, a place where you (ideally) sleep soundly and wake up refreshed, ready for a new day. Let’s be real, though — that’s not always the case, especially if work stress or a snoring partner keeps you awake past bedtime. Piles of unfolded laundry and late-night phone scrolling don’t help you clock in quality z’s either.

All featured products and deals are selected independently and objectively by the author. House Outlook may receive a share of sales via affiliate links in content.

Your bedroom should be an oasis, a place where you (ideally) sleep soundly and wake up refreshed, ready for a new day. Let’s be real, though — that’s not always the case, especially if work stress or a snoring partner keeps you awake past bedtime. Piles of unfolded laundry and late-night phone scrolling don’t help…

There are a few essential ingredients for a good night’s sleep: a bed that’s your preferred firmness, a cool temperature, light-blocking window coverings, and a pillow that accommodates your sleeping position. Add the proper paint finish to that list too. That’s right — the paint finish you choose for your bedroom could be the difference between tossing and turning and snoozing soundly.

A matte paint finish is often recommended for bedrooms because it absorbs light, rather than reflecting it, creating a softer, cozier atmosphere. Since a matte finish gives off little to no shine, you’re left with a smooth, velvety look that aids in drifting off to dreamland.

Related: 8 Clever Design Tips for a Cozy Space Without Clutter

Steer clear of glossy or semi-gloss options in the bedroom. Those finishes reflect light, which can make a space feel energizing rather than restful. Glossy and semi-gloss paints are best utilized in kitchens and bathrooms, as they resist stains and moisture. This allows for easy clean-up of spaghetti sauce splatter in a kitchen and helps prevent mold growth in a bathroom.

Advertisement

The Best Bedroom Paint Colors for Improved Sleep

For an even more restful bedroom, consider one of these sleep-promoting matte paint colors:

• Sage green evokes a similar feeling to being in nature, which promotes a peaceful setting.

• Warm white is always a good paint choice. It’s the ultimate neutral that acts as a blank slate, though you’ll want to be mindful of the undertone. A bright white is stimulating, while a white with yellow, red, or beige undertones is warming.

• Soft blues, such as powder blue or pastel blue, create a calm environment since the shades are often associated with clear skies or water.

• Blush pink — a barely-there rosy tone, not a bright Barbie pink — is a comforting color that adds a gentle warmth without feeling overwhelming.

Advertisement
Megan McCarty
Writer
Megan McCarty is a Los Angeles-based writer who covers the fun stuff: design, travel, wellness, beauty, and fashion. She has written for publications including Domino, The Spruce, MyDomaine, Bustle, and Rue Magazine. Her life rules include, but are not limited to, zipper when merging, contribute to your IRA, and do the nice thing.
This article is for general informational purposes only.
Affiliate Disclaimer 
|
Financial Disclaimer
Featured Image Credit:  Alexander Mass/ Pexels | Updated  Feb 24, 2025 |
Advertisement
Uncategorized 3m read
0

A Simple Trick To Prevent Window Condensation

Not only does window condensation cloud a good view, but the moisture also can lead to structural damage over time. This annoying phenomenon results from the temperature difference between the windowpane and the surrounding air. Maybe it’s cold outside and you’re running the heat, or it’s a humid day and you’re blasting the AC — either way, you risk having foggy windows. Thankfully, we just learned about a simple hack that can prevent window condensation from forming in the first place. Here’s how it works.

All featured products and deals are selected independently and objectively by the author. House Outlook may receive a share of sales via affiliate links in content.

Not only does window condensation cloud a good view, but the moisture also can lead to structural damage over time. This annoying phenomenon results from the temperature difference between the windowpane and the surrounding air. Maybe it’s cold outside and you’re running the heat, or it’s a humid day and you’re blasting the AC —…

How To Prevent Window Condensation

This method is inspired by YouTuber Karl Fixes, who, like many of us, has experienced this irksome issue. The hack requires a few basic tools that you may already have lying around the house.

What You’ll Need

Squeegee

Microfiber cleaning cloth

Liquid dish soap

Once you’ve acquired those three items, it’s time to get to work. The first step is to dry the inside of the windowpane using a squeegee (a clean microfiber cloth or anything else that can soak up moisture will also suffice). After wiping away the condensation, apply a small amount of liquid dish soap to a fresh microfiber cloth. Then rub the soap into the glass until a thin, even film coats the surface — this is what helps prevent condensation. Sure, your window might be a little streaky from the soap, but it beats looking out a fogged-up window.

This method works because dish soap reduces the surface tension of water, preventing it from forming into droplets that stick to and cloud your windows. Keep in mind that this is a temporary solution — you’ll need to reapply the dish soap every few days as long as condensation continues to form.

Advertisement

The Right Products for the Job

If you’re lacking the necessary tools, fear not, because we have a few inexpensive suggestions to help you eliminate condensation in no time. This simple handheld squeegee won’t break the bank, but it will help you achieve clearer windows. Microfiber cloths are another must-have for removing moisture and grime without leaving streaks behind. Lastly, pick up some liquid dish soap, which is unabrasive and ideal for the job.

Related: A Simple Trick for Keeping Tools Rust-Free

Hopefully these instructions are clearer than a foggy window. Just set aside a couple of minutes each week to stay on top of this task, and you’ll never have to worry about window condensation again.

Advertisement
Bennett Kleinman
Staff Writer
Bennett Kleinman is a New York City-based staff writer for Optimism Media, covering topics for several brands including House Outlook and Better Report. He previously contributed to television programs such as "Late Show With David Letterman" and "Impractical Jokers," and digital publications like The Onion. Bennett is also a devoted New York Yankees and New Jersey Devils fan, and thinks plain seltzer is the best drink ever invented.
This article is for general informational purposes only.
Affiliate Disclaimer 
|
Financial Disclaimer
Featured Image Credit:  mady70/ Shutterstock | Updated  Feb 26, 2025 |
Advertisement
Home Improvement 6m read
0

Appliance Maintenance Tasks You Probably Don’t Do Enough

What would our homes be without the appliances in them? They keep us warm in the winter and cool in the summer, refrigerate our perishables, cook our meals, and allow us the cleanliness and comforts of modern life.

All featured products and deals are selected independently and objectively by the author. House Outlook may receive a share of sales via affiliate links in content.

What would our homes be without the appliances in them? They keep us warm in the winter and cool in the summer, refrigerate our perishables, cook our meals, and allow us the cleanliness and comforts of modern life.

Aside from a quick wipe-down, though, most people don’t maintain appliances such as ovens, water heaters, and HVAC systems until something goes wrong. Making appliance maintenance a regular part of your household upkeep can not only reduce the chances of future breakdowns but also minimize energy costs and ensure efficient operation.

If you’re intimidated by the idea of maintaining your household appliances, don’t fret. Even major machines can be kept in top condition with just a few tools and a little time, especially if you inspect them regularly. Let’s take a look at six appliance maintenance tasks to keep your home running smoothly.

Advertisement

Deep Cleaning Your Washing Machine

Clean clothes require a clean machine, and you can get yours in great shape in the time it takes to run a quick cycle. You do this by targeting the drain and the filter. To start, turn off the water supply to your machine, then disconnect the drain hose from the connector and let it empty into a small bucket. You might notice some muck stuck in there — just fish it out with your finger to allow the water to flow freely. Next, if your washing machine has a filter, remove it and scrape off any trapped lint or other debris. Once clean, replace the filter and reconnect the drain hose. The final step is to turn the water back on and disinfect the machine by running a hot water cycle with either 1/2 cup bleach (1/4 cup for high-efficiency machines) or a mixture of 2 cups vinegar and 1/2 cup baking soda.

Credit: fast-stock/ Shutterstock

Keeping Your Dryer Vent Flowing

While you’re in the laundry room, make sure your dryer is getting some care too. First, unplug your machine, and if it’s a gas model, turn off the gas supply valve. Then, locate your dryer vent, which is typically on the back of the machine near the bottom. Remove the cover, if there is one, or the vent hose.

Related: This Genius Laundry Hack Can Significantly Reduce Drying Time

You’ll probably notice the usual mess you might find in your lint trap — lint, hair, bits of receipt paper, etc. Use your hand to clear away as much as possible and throw it in the trash. Attach a crevice tool to your vacuum hose and suction out any trapped lint or debris. Put the cover back on or secure the vent hose. Plug in your machine, turn on the gas supply valve if necessary, and you should be good for another year.

Credit: Benjamin Clapp/ Shutterstock
Advertisement

Flushing Your Hot Water Heater

This one may seem intimidating, but it’s an important bit of maintenance to keep up with. Fortunately, it’s quick and easy to do on your own. Start by turning off the cold water supply and the power. If you have a gas heater, turn the pilot light off or as low as you can. You won’t need tools for this, but you will need a garden hose to drain the water out of your heater. Attach the hose to your drain valve at the bottom of the tank, and place the other end at a floor drain, or outside. To help the water drain, run hot water out of a faucet in another room; this allows air to enter the tank and break the vacuum. Draining the tank usually takes about 30 minutes to an hour, and once it’s emptied, you can turn the cold water supply off and on a few times to help flush out any sediment at the bottom. Let the water drain out of the garden hose until it runs clear. Then, remove the hose, close the drain valve, refill the tank, and turn the power back on (or relight the pilot light if it’s a gas water heater).

Credit: Chad Robertson Media/ Shutterstock

Cleaning Your Fridge Coils

Your refrigerator consumes a lot of energy — an estimated 18% to 20% of a household’s electricity use — but you can keep it running efficiently by cleaning the condenser coils once or twice a year. You’ll usually find these coils on the back of the fridge, or at the bottom behind a grate. To clean them, just pop off any covering, and use a coil brush to gently remove dirt, pet hair, crumbs, or other debris. You can use your vacuum cleaner’s soft brush attachment to suck up anything trapped between the coils. Then, use a dry microfiber cloth to pick up the rest.

Credit: LightCooker/ iStock
Advertisement

Showing Your Oven Some Love

Wiping down the stovetop goes a long way in maintaining your oven, but cleaning the inside is essential to its long-term performance. Cleaning baked-on grime off the grates and oven door is a task that should be done regularly. You can take your cleaning routine a step further by checking the oven door seal; the narrow bit of rubber or silicone that runs along the edges of the door. Look for cracks or breaks in the seal. If necessary, replace it with a new oven door seal to keep the heat in, ensuring evenly and efficiently cooked meals.

Related: An Easy Way To Remove Baked-On Food in Your Oven
Credit: Denys Niezhientsev/ Shutterstock

Updating Your Air Filters

No matter where you live, you’ll likely need to use your heating and cooling system at some point during the year. Keeping it in the best shape possible not only ensures your comfort but also saves you money on energy bills. An easy way to do this at home is by simply inspecting and replacing old or outdated air filters. All you need to do is turn your HVAC system off, remove your old filter, and replace it with a brand-new air filter of the same size. Then, turn your system on, and enjoy clean, filtered air for the next six to 12 months.

Credit: mphillips007/ iStock

Adding these maintenance tasks to your regular cleaning routine will help you get the most out of your household appliances. We recommend doing one every other month — that way, you won’t feel overwhelmed by a full day of maintenance, and it will be easy to remember what’s next to address.

Advertisement
Krissy Howard
Writer
Krissy Howard is a New Mexico-based writer. Her work has appeared in Byrdie, Hunker, and Simplemost, and she is the former managing editor of music satire website, The Hard Times.
This article is for general informational purposes only.
Affiliate Disclaimer 
|
Financial Disclaimer
Featured Image Credit:  Scott Habermann/ Shutterstock | Updated  Feb 15, 2025 |
Advertisement
Cleaning 3m read
0

How a Chef Removes Stubborn Stains From Wooden Cutting Boards

Commercial kitchens are filled with durable polyethylene cutting boards, which are relatively inexpensive, long-lasting, and capable of withstanding the high heat of a commercial dishwasher. Yet at home, many chefs opt for wooden cutting boards. They’re functional, beautiful, and may even have antimicrobial properties, unlike their plastic counterparts. The downside is they’re prone to staining, which can make them less attractive. There are several hacks out there for removing cutting board stains, but what do the pros do? Let’s explore some chef-approved, stain-fighting techniques.

All featured products and deals are selected independently and objectively by the author. House Outlook may receive a share of sales via affiliate links in content.

Commercial kitchens are filled with durable polyethylene cutting boards, which are relatively inexpensive, long-lasting, and capable of withstanding the high heat of a commercial dishwasher. Yet at home, many chefs opt for wooden cutting boards. They’re functional, beautiful, and may even have antimicrobial properties, unlike their plastic counterparts. The downside is they’re prone to staining,…

Removing Stains From Wood Cutting Boards

The good news is that many popular stain-removal hacks actually work. Scouring with baking soda or kosher salt works because both are gentle abrasives that also absorb pigments. Acidic liquids such as vinegar and lemon juice have a bleaching effect and act as solvents. Overproof alcohol is a lesser-known but surprisingly effective solvent for lifting stains.

Adding an acid to baking soda increases its stain-removing power by causing it to fizz. Hydrogen peroxide works similarly, bleaching and sanitizing the board. A diluted solution of chlorine bleach (1 tablespoon per gallon of water) offers the same benefits.

Related: An Easy Way To Remove Baked-On Food in Your Oven

So, is there a winning combination or specific order for these cleaning methods? Here’s what our resident chef suggests.

Advertisement

The Ultimate Stain-Removal Method

Unless the manufacturer of your cutting board suggests a different process, the following steps will effectively remove most common cutting board stains: 

1. Pour high-proof alcohol, such as Everclear or Golden Grain, over the stain and let it rest for five minutes before wiping it off.

2. Shake a small mound of baking soda or coarse salt over the stain, and use a damp cloth or half of a lemon to scour it well.

3. Wash the cutting board with dish soap and warm water, rinse, towel dry, then apply either 3% hydrogen peroxide or a solution of 1 teaspoon of chlorine bleach in a quart of water. Let it sit for five minutes, then air-dry or wipe dry with a clean towel.

Bonus Tip

Over time, the working surface of your wood cutting board becomes porous and easily stained, and scraping it periodically with a putty knife helps to remove that layer. For truly well-used boards, taking them to a wood shop and running them through a planer restores their pristine original finish.

Once your board is clean and completely dry, seal it with a food-grade mineral oil or specialized cutting board oil (available online or at most kitchenware retailers). This seals the wood, preserving its beauty and protecting against future stains.

Advertisement
Fred Decker
Writer
Fred Decker is a trained chef and former restaurateur. Since closing his restaurants over a decade ago he has been a prolific freelance writer, publishing several thousand articles on dozens of high-volume websites including Taste Of Home, Hunker, Tasting Table, Week&, eHow, and GOBankingRates. He lives on a rural acreage shared with a big garden, chickens, rabbits, and grandkids.
This article is for general informational purposes only.
Affiliate Disclaimer 
|
Financial Disclaimer
Featured Image Credit:  Pike-28/ Shutterstock | Updated  Feb 14, 2025 |
Advertisement
Food & Drink 3m read
0

Don’t Throw Away Crystalized Honey — Do This Instead

Honey is the original all-natural sweetener. It’s more than just an ingredient — it’s a cultural benchmark, which is why we speak of things as “sweeter than honey” or “a land of milk and honey.” It’s also an unusually durable food, turning up in ancient tombs still unspoiled. Yet, a jar of honey stored in your cupboard for just a few months may set into a solid, crystallized lump and lose its free-flowing beauty. You don’t need to throw it out, though. Crystallized honey hasn’t spoiled, and you can salvage it quickly and easily.

All featured products and deals are selected independently and objectively by the author. House Outlook may receive a share of sales via affiliate links in content.

Honey is the original all-natural sweetener. It’s more than just an ingredient — it’s a cultural benchmark, which is why we speak of things as “sweeter than honey” or “a land of milk and honey.” It’s also an unusually durable food, turning up in ancient tombs still unspoiled. Yet, a jar of honey stored in…

A Quick Q&A About Crystallized Honey

First, there are a few common questions about crystallized honey that we should address.

Why Is My Honey Crystallized?

Did you ever make rock candy as a kid? It starts with creating a sugar-heavy solution. Then, you add strings or wooden skewers to syrup-filled Mason jars to attract the sugar and form crystals. Honey is a heavy solution of natural sugars, and contains grains of pollen that attract the sugars. So, crystallization occurs naturally over time.

Is Crystallized Honey Still Good?

Absolutely. Think of it as you do peanut butter: It can be smooth or crunchy, but it’s good either way. In this case, it has simply gone from pourable to spreadable.

Related: An Easy Trick To Revive Carrots That Have Gone Limp

What Can I Do With Crystallized Honey?

You can use it in many of the same ways. Bake with it, spread it on a biscuit, or stir it into a hot drink.

Advertisement

How To “Uncrystallize” Honey

If you prefer to use honey in its liquid form, it’s easy to fix. Just put your plastic squeeze bottle in a bowl or saucepan of warm (not boiling) water, and wait for five to 10 minutes (depending on how much honey has crystallized). You may have to give the honey a good stir to melt all of the crystals, but the heat should return it to its liquid gold state.

If the honey is in a glass jar, you can simply microwave it in 30-second increments until it’s entirely liquified again. For artisan honeys with delicate flavors, keep the temperature low — ideally under 100 degrees Fahrenheit — to protect those volatile aromas. For mass-market supermarket honey, you can risk a little impatience and higher temperatures. 

Honey will be slow to recrystallize at temperatures between 70 and 80 degrees Fahrenheit, so keeping it in a warm spot is helpful. Alternatively, you can delay crystallization for much longer by storing honey in the fridge, although this will make it stiff and less pourable. Just let it warm up to room temperature before you use it, and it’ll be fine.

Advertisement
Fred Decker
Writer
Fred Decker is a trained chef and former restaurateur. Since closing his restaurants over a decade ago he has been a prolific freelance writer, publishing several thousand articles on dozens of high-volume websites including Taste Of Home, Hunker, Tasting Table, Week&, eHow, and GOBankingRates. He lives on a rural acreage shared with a big garden, chickens, rabbits, and grandkids.
This article is for general informational purposes only.
Affiliate Disclaimer 
|
Financial Disclaimer
Featured Image Credit:  Hsyn20/ Shutterstock | Updated  Feb 14, 2025 |