Advertisement
Uncategorized 2m read
0

An Easy Way To Safely Discard Cooking Oil

Picture this: You’ve just shallow fried a batch of golden, perfectly crispy schnitzel. With every last breadcrumb devoured, you’re left to contend with a greasy mess. But what should you do with all that cooking oil?

All featured products and deals are selected independently and objectively by the author. House Outlook may receive a share of sales via affiliate links in content.

Picture this: You’ve just shallow fried a batch of golden, perfectly crispy schnitzel. With every last breadcrumb devoured, you’re left to contend with a greasy mess. But what should you do with all that cooking oil?

If your first thought is to pour it down the drain, take a pause. There’s a safe and easy way to get rid of the remaining oil, and you only need one kitchen essential to do it: aluminum foil.

Oil and Plumbing Don’t Mix

While there are plenty of ways to dispose of cooking oil properly, whatever you do, don’t pour it down the sink or toilet. Although leftover cooking oil may be liquid when it’s hot or warm, it solidifies as it cools, which can wreak havoc on your plumbing system. Over time, it can build up and cause blockages in your pipes. Not only can pouring oil down the drain harm your home, but it also can affect the local sewer system.

Related: 10 Things You Should Never Put Down Your Garbage Disposal
Advertisement

Ditch Cooking Oil the Right Way

Once you’re done cooking, let the oil cool and tear off a piece of aluminum foil about the size of a sheet of paper. You can eyeball it and make the piece smaller or larger depending on how much cooking oil you’re looking to dispose of.

Then, clean out your kitchen sink and mold the aluminum foil into the shape of the drain. You can use your fist, a drinking glass, or a spoon to create a cuplike shape, being careful not to puncture the foil. Leave a few inches of excess foil on all sides to prevent drips and make disposal easier.

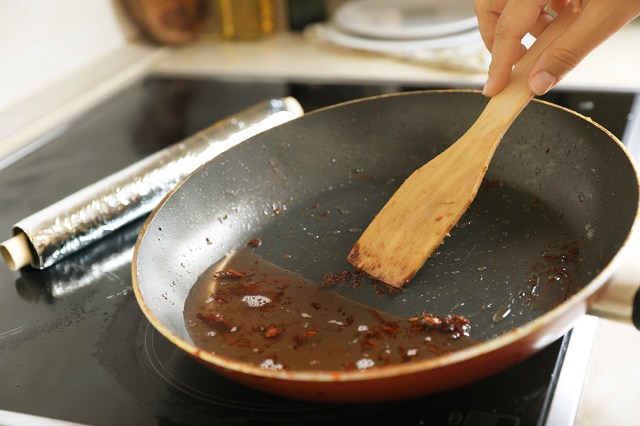
Pour the cooking oil from the pan into the foil pocket, allowing it to cool off even more until it hardens. Note that oils high in saturated fats solidify at room temperature, while oils high in unsaturated fats remain liquid. Carefully remove the foil from the sink, bunching the open ends tightly to secure the oil. Now you can simply toss the sealed foil packet into the trash.

Advertisement
Pauline Lacsamana
Writer
Pauline Lacsamana is a freelance writer and editor who specializes in commerce, home, design, and lifestyle. She has bylines in The Spruce, Business Insider, U.S. News & World Report, Hunker, MyDomaine, Parade, and more.
This article is for general informational purposes only.
Affiliate Disclaimer 
|
Financial Disclaimer
Featured Image Credit:  New Africa/ Shutterstock | Updated  Jan 31, 2025 |
Advertisement
Decorating 3m read
0

The Triangle Method Is the Key to Well-Designed Bookshelves

Bookshelves are more than just a place to store your favorite reads. They also provide a prominent space to show off your personality through meaningful objects, balancing pretty with practical. There’s a trick to arranging bookshelves so they feel curated, not chaotic, though. The simple solution? Triangles.

All featured products and deals are selected independently and objectively by the author. House Outlook may receive a share of sales via affiliate links in content.

Bookshelves are more than just a place to store your favorite reads. They also provide a prominent space to show off your personality through meaningful objects, balancing pretty with practical. There’s a trick to arranging bookshelves so they feel curated, not chaotic, though. The simple solution? Triangles.

What Is the Triangle Method?

Don’t panic — there’s no need to dust off a geometry textbook. The triangle method is a styling technique that involves arranging objects (think books, framed photos, decorative pieces, and plants) in a triangular shape to create visually appealing vignettes.

It’s easy to put into practice: The key is to horizontally or vertically stack objects so they form a triangle when viewed as a whole. Remember that there are multiple ways to form visual triangles; you could opt for the classic equilateral triangle, a right triangle, or an isosceles triangle. For example, on one shelf you may place a tall vase to the left, a stack of books (shorter than the vase) in the center, and a small framed photo (shorter than the stack of books) to the right, creating a right triangle. Or, you could form a regular triangle by stacking two similarly sized books topped with a decorative object, such as a brass butterfly.

Related: How To Create More Bookshelf Space With an Egg Carton

TikTok creator Nick Lowry shared a helpful tip about the triangle method: Don’t copy the same vignette arrangement on a shelf above or below, as it will end up looking unbalanced. Alternating how your triangles are organized allows the eye to effortlessly move around the arrangements.

Advertisement

More Tips for Expertly Styling Bookshelves

Weigh Them Down: Large and heavy items, such as coffee table books or a collection of records, look best on bottom shelves. They visually ground the bookshelves.

Style Each Shelf Individually: Treat each shelf as an individual vignette, varying the size and placement of the triangles to avoid monotony.

Take Your Time: The best bookshelves are filled with special-to-you items collected over time. Consider adding seashells from a beach vacation, a framed vintage family photo, or a handmade ceramic vase gifted from a friend.

Incorporate Negative Space: Leave some open space around your triangles to ensure the bookshelves don’t feel too cluttered.

• Mix and Match Qualities: Variety is key. Integrate items with different shapes, colors, textures, and materials to add dimension and interest.

• Group Items in Odd Numbers: Objects arranged in sets of three, five, or other odd numbers offer a sense of balance, while also creating a focal point of a central object.

Advertisement
Megan McCarty
Writer
Megan McCarty is a Los Angeles-based writer who covers the fun stuff: design, travel, wellness, beauty, and fashion. She has written for publications including Domino, The Spruce, MyDomaine, Bustle, and Rue Magazine. Her life rules include, but are not limited to, zipper when merging, contribute to your IRA, and do the nice thing.
This article is for general informational purposes only.
Affiliate Disclaimer 
|
Financial Disclaimer
Featured Image Credit:  PeopleImages/ iStock | Updated  Jan 31, 2025 |
Advertisement
Decorating 5m read
0

6 Tips for Arranging a Cohesive Gallery Wall

Gallery walls are an eye-catching way to add personality — specifically your personality — to your home. Artwork can showcase your style, interests, and loved ones in a way a piece of furniture or paint color can’t. The thought of hanging a gallery wall can be daunting, though. How do you choose which pieces to hang, without spending an entire paycheck or two? How do you create a unified (but not uniform) look among the pieces? And how do you hang everythingwithout accidentally adding 100 holes to your wall?

All featured products and deals are selected independently and objectively by the author. House Outlook may receive a share of sales via affiliate links in content.

Gallery walls are an eye-catching way to add personality — specifically your personality — to your home. Artwork can showcase your style, interests, and loved ones in a way a piece of furniture or paint color can’t. The thought of hanging a gallery wall can be daunting, though. How do you choose which pieces to…

Not to worry — with these six easy tips, you’ll be able to arrange a cohesive gallery wall that will show off your art collection or personal photos and get all your guests talking.

Materials You’ll Need

Artwork or photos

Hammer

Nails, picture hangers, or double-sided adhesive tape

Ruler or measuring tape

Level

Kraft paper (optional)

Pencil (optional)

Tip 1: Narrow Down a Color Palette

To pull off a good-looking gallery wall, you’ll need to be intentional in choosing a color scheme. Pieces shouldn’t be matchy-matchy — that will feel forced — but you should opt for art that’s similar in tone and intensity. For example, you could start with a base of navy, cream, and gold. Then add small pops of color, pulling accent shades from dominant pieces.

Related: 5 Tips for Finding Home Decor Treasures at Thrift Stores

If you’re planning a photo-heavy gallery wall, consider mixing and matching the frame colors. To keep it cohesive, interior designer Emily Henderson recommends starting with two or three frame colors and then determining whether more are needed. While some people prefer the look of all color or all black and white photos, don’t be afraid to use both — the key is finding the right balance.

Credit: Pavel Danilyuk/ Pexels
Advertisement

Tip 2: Start With the Largest Piece

Anchor your gallery wall by starting with your largest piece of art. Don’t place it directly in the center, though. Hanging the biggest piece slightly off-center (but still toward the middle) will encourage your eye to travel around the gallery wall. It will serve as a jumping-off point for everything else you’ll hang, so simply fill in around it. If you have a second standout piece, hang it diagonally across from your largest one for a balanced feel.

Credit: alleksana/ Pexels

Tip 3: Mix It Up

Variety is the spice of life — and of your gallery wall, too. For a compelling mix of pieces, select a diverse collection of artwork in a range of sizes and orientations. You’ll want horizontal, vertical, and square pieces. You’ll also want oversized, petite, and in-between-sized ones. Including oddly shaped pieces of art adds even more interest; think about adding a miniature portrait in a round frame or pressed flowers in a shadow box.

Not everything needs to be in a frame, either. You could include a sconce for dimension, a hanging plant for liveliness, a tapestry for texture, or an embroidery hoop for some curves. The more mediums, the better. Mix and match paintings with photography, textiles, thrift store finds, and more.

Credit: Alesia Kozik/ Pexels
Advertisement

Tip 4: Include Meaningful Items

No matter where your gallery wall is — an entryway, a hallway, a living room — it’ll become a focal point, so be sure to include pieces that are meaningful to you. Big-box store art is convenient and affordable, but can feel stale if it’s not complemented by more personal pieces.

Related: Your Utensil Drawer Holds the Secret to Perfectly Hung Pictures

If the word “artwork” has you seeing dollar signs, remember that anything can be art, especially if it’s important to you. Consider framing a kindergartener’s masterpiece, a sonogram, vintage family photos, or a bar napkin from the location of your first date.

Credit: Jess Loiterton/ Pexels

Tip 5: Keep Pieces Equidistant From Each Other

Finding the balance of space between frames (“rivers,” as some interior designers call them) is essential for a professional-looking gallery wall. Too close feels cramped; too far away feels accidental. Aim for consistent rivers that are 2 to 3 inches apart, or up to 6 inches if all of your pieces are large-scale. This is where a ruler or measuring tape comes in handy, as well as a level to make sure every piece is hung straight.

Credit: cottonbro studio/ Pexels

Tip 6: Strategize a Seamless Way To Hang Everything

Before you start hammering nails into your walls willy-nilly, come up with a game plan — otherwise, you may end up with a wall full of holes that need patching and painting. TikTok creator Katie Behlert Kruithof of Yeah Baby Goods uses this technique:

1. Measure kraft or wrapping paper to the size of your wall.

2. With the paper on the floor, arrange your pieces and experiment with different layouts.

3. Once you find a placement you like, take a picture of it and trace the outline of each frame.

4. Tape the paper to your wall.

5. Find the center of each outlined frame with a tape measure and mark with a pencil dot. At the marked spots, drill pilot holes before adding screws, or hammer in nails. Nails are sufficient for lightweight pieces, but screws are recommended for anything over 20 pounds.

6. Remove the paper. 

7. Refer to the picture to hang your artwork.

Credit: mixetto/ iStock
Advertisement
Megan McCarty
Writer
Megan McCarty is a Los Angeles-based writer who covers the fun stuff: design, travel, wellness, beauty, and fashion. She has written for publications including Domino, The Spruce, MyDomaine, Bustle, and Rue Magazine. Her life rules include, but are not limited to, zipper when merging, contribute to your IRA, and do the nice thing.
This article is for general informational purposes only.
Affiliate Disclaimer 
|
Financial Disclaimer
Featured Image Credit:  Nealette Monique/ Pexels | Updated  Jan 31, 2025 |
Advertisement
Gardening 3m read
0

3 Hacks To Keep Store-Bought Roses Fresh and Beautiful

Nothing’s more synonymous with Valentine’s Day than roses (chocolate comes close), but the flowers get a bad rap for being boring. They’re far from it, though, especially if you take the time to prepare the blooms, whether for yourself or a special someone. Shelling out serious dollars on a florist-arranged bouquet isn’t necessary; grocery store flowers can be made to look luxurious.

All featured products and deals are selected independently and objectively by the author. House Outlook may receive a share of sales via affiliate links in content.

Nothing’s more synonymous with Valentine’s Day than roses (chocolate comes close), but the flowers get a bad rap for being boring. They’re far from it, though, especially if you take the time to prepare the blooms, whether for yourself or a special someone. Shelling out serious dollars on a florist-arranged bouquet isn’t necessary; grocery store…

Bring a dozen store-bought roses to life — and keep them alive longer — with a few easy steps. Scroll on to learn how to transform inexpensive roses from blah to beautiful, both this Valentine’s Day and all year long.

1. Prep the Stems

First, remove any leaf that would sit below the vase’s waterline. If leaves are submerged in water, they’ll create bacteria that will shorten the lifespan of your flowers. Next, trim the stems at a 45-degree angle using floral shears or a sharp knife. Using regular scissors to cut rose stems can crush the vessels that deliver water and nutrients to the head. This step should be repeated every two to three days, cutting off about an inch each time. Doing so helps the stems absorb water better and reduces bacteria buildup.

Note: When working with roses, it’s best to wear gardening gloves. They’ll spare your hands from painful thorn pricks.

Advertisement

2. Fluff the Petals

Though it may pain you to pull off petals, remove the guard petals — the outer layer of petals that protect the rest of the rose. Guard petals are often bruised, wilted, or have black edges due to a variety of environmental factors, including frost or sun damage. Removing guard petals is mostly done for aesthetic purposes, but discarding the decaying ones can help protect the bloom from bacterial harm.

Once you reveal the fresh petals underneath, gently stretch two layers of petals back to make the roses look fuller. Work with room temperature roses, since their flexibility makes them easier to bend and reduces the risk of tearing petals. Use a soft touch, too, to minimize bruising.

Related: This Common Product Is Key for Making Heart-Shaped Baked Goods

3. Keep It Cool

Place your arrangement in a tall vase filled about three-quarters full with lukewarmcool water mixed with a teaspoon of white granulated sugar or flower food. (Lukewarm water is best as it effectively dissolves solvents while preventing shock to the blooms.) Display the roses in a cool spot away from direct sunlight, heat sources such as radiators or fireplaces, and appliances that generate heat. To extend their lifespan, you can refrigerate roses in their vessel overnight or store them in a cold garage. The sweet spot is between 33 and 37 degrees Fahrenheit, which helps preserve the roses’ freshness by slowing down their respiration rate — the rate at which they consume their food reserves to stay alive. 

Bouquet Building 101

Even store-bought roses can resemble a professionally-arranged bouquet with a little help. Start with two roses in your hand, crisscrossing their stems. Add roses one at a time, alternating between each side to create a neat arrangement. Style to your liking, then enjoy your beautiful blooms.

Advertisement
Megan McCarty
Writer
Megan McCarty is a Los Angeles-based writer who covers the fun stuff: design, travel, wellness, beauty, and fashion. She has written for publications including Domino, The Spruce, MyDomaine, Bustle, and Rue Magazine. Her life rules include, but are not limited to, zipper when merging, contribute to your IRA, and do the nice thing.
This article is for general informational purposes only.
Affiliate Disclaimer 
|
Financial Disclaimer
Featured Image Credit:  RichLegg/ iStock | Updated  Jan 30, 2025 |
Advertisement
Home Improvement 2m read
0

A Simple Trick for Keeping Tools Rust-Free

A reliable set of tools is essential, whether you’re an avid DIYer or only need them for emergencies. But even the best tools are susceptible to rust, which compromises their structural integrity and inhibits proper function. Rust is most likely to form when tools come into contact with moisture, but thankfully, there’s a simple trick you can use to keep those moisture levels low and your tools rust-free.

All featured products and deals are selected independently and objectively by the author. House Outlook may receive a share of sales via affiliate links in content.

A reliable set of tools is essential, whether you’re an avid DIYer or only need them for emergencies. But even the best tools are susceptible to rust, which compromises their structural integrity and inhibits proper function. Rust is most likely to form when tools come into contact with moisture, but thankfully, there’s a simple trick…

Chalk to the Rescue

Regular blackboard chalk — the type commonly found in classrooms or craft stores — is an unlikely, inexpensive, and surprisingly effective tool for preventing rust. Chalk is naturally porous, meaning it absorbs moisture from the air. The more moisture it soaks up, the drier the air around your tools becomes, reducing the likelihood of rust.

Related: How To Choose the Right Size Drill Bit Every Time

What Should You Do?

Begin by emptying out your toolbox (consider decluttering while you’re at it) and giving it a thorough cleaning, inside and out. Allow the box to fully dry, then add your hand tools, and place several pieces of chalk in various drawers or compartments. There’s no rule of thumb, but consider starting with two to three pieces for a small toolbox, three to five for a medium toolbox, and five to seven for a large toolbox. 

Advertisement

Once complete, seal the box tightly so no additional moisture creeps in. As time goes on, you’ll likely see pieces of chalk soften and crumble. If this happens, it’s time to replace that piece with a brand-new stick of chalk.

The Best Chalk To Buy

It’s better to use multiple sticks of blackboard chalk than one extra-large stick of sidewalk chalk, as the former helps to absorb moisture evenly throughout the toolbox. When it comes to color, you can choose whatever suits you; there’s no difference between white chalk and bright shades in terms of their ability to absorb water.

Follow this one simple trick to help keep your tools rust-free. Who knows — you might even end up with some leftover chalk for designing a menu board or future art projects.

Advertisement
Bennett Kleinman
Staff Writer
Bennett Kleinman is a New York City-based staff writer for Optimism Media, covering topics for several brands including House Outlook and Better Report. He previously contributed to television programs such as "Late Show With David Letterman" and "Impractical Jokers," and digital publications like The Onion. Bennett is also a devoted New York Yankees and New Jersey Devils fan, and thinks plain seltzer is the best drink ever invented.
This article is for general informational purposes only.
Affiliate Disclaimer 
|
Financial Disclaimer
Featured Image Credit:  Dejan Marjanovic/ iStock | Updated  Jan 29, 2025 |
Advertisement
Cleaning 2m read
0

Instead of Replacing Your Plastic Shower Liner, Do This

Aside from kitchens, bathrooms tend to accumulate dirt, grime, and bacteria more quickly than other rooms. And if we had to guess, we’d say they’re probably your least favorite spots to clean. Between the moisture, humidity, shedding hair, and toothpaste spills, it’s no surprise these high-traffic areas don’t stay clean for long.

All featured products and deals are selected independently and objectively by the author. House Outlook may receive a share of sales via affiliate links in content.

Aside from kitchens, bathrooms tend to accumulate dirt, grime, and bacteria more quickly than other rooms. And if we had to guess, we’d say they’re probably your least favorite spots to clean. Between the moisture, humidity, shedding hair, and toothpaste spills, it’s no surprise these high-traffic areas don’t stay clean for long.

During regular bathroom cleanings, most people focus on the tub, sink, and toilet. One task — cleaning the shower curtain liner — is often overlooked, but fortunately for all of us, it’s as easy as doing a load of laundry.

Related: How To Keep Your Toilet Brush Germ-Free

Since shower curtain liners are among the more budget-friendly home essentials, you may be tempted to toss them at the first sight of any mildew or grime. However, cleaning them is easier than you think — all you need is a few supplies.

Advertisement

Before You Clean

This home hack is an easy one, but always check the care instructions before cleaning any item. Most plastic, vinyl, and fabric shower curtain liners are machine washable, but it’s better to be safe than sorry.

What You’ll Need

Bath towel

Laundry detergent

¼ cup distilled white vinegar

How To Clean Shower Curtain Liners

First, remove your shower curtain liner and throw it in your washing machine. Next, add a clean bath towel. A bath towel not only prevents the liner from bunching but also acts as a mild abrasive to help clean it.

Add a small amount of laundry detergent and ¼ cup of distilled white vinegar, which helps remove soap scum and kills most mold species. Wash the liner on a delicate cycle using warm water. 

Avoid putting the shower curtain liner in the dryer after washing — you don’t want it to melt or get damaged. Simply shake off any water droplets and hang it back on the shower curtain rod to air dry.

Advertisement
Pauline Lacsamana
Writer
Pauline Lacsamana is a freelance writer and editor who specializes in commerce, home, design, and lifestyle. She has bylines in The Spruce, Business Insider, U.S. News & World Report, Hunker, MyDomaine, Parade, and more.
This article is for general informational purposes only.
Affiliate Disclaimer 
|
Financial Disclaimer
Featured Image Credit:  Alla/ iStock | Updated  Jan 28, 2025 |
Advertisement
Decorating 4m read
0

5 Tips for Finding Home Decor Treasures at Thrift Stores

Thrift stores are a gold mine for unique home decor finds. Whether you’re looking for a few trinkets to add to a vignette or you’re in need of a “new” (at least to you) dining table, you can find all sorts of high-quality, stylish pieces at affordable prices. The next time you head to the local thrift shop, there are a few tips and tricks to keep in mind when scouring the shelves for secondhand treasures — especially if quality is top of mind. 

All featured products and deals are selected independently and objectively by the author. House Outlook may receive a share of sales via affiliate links in content.

Thrift stores are a gold mine for unique home decor finds. Whether you’re looking for a few trinkets to add to a vignette or you’re in need of a “new” (at least to you) dining table, you can find all sorts of high-quality, stylish pieces at affordable prices. The next time you head to the…

Ahead, we share how to find home decor at thrift stores and get the most bang for your buck by considering key factors such as material, weight, and design.

How To Find Home Decor at Thrift Stores

1. Look for Solid Wood Pieces

Thrift stores, first and foremost, are about affordability — but that doesn’t mean you have to sacrifice quality. While there will surely be a collection of cheaply made items, you can also find plenty of solid wood furniture pieces that will restore your faith in finding a good deal. Whether you’re shopping for a desk, bookshelf, or entryway bench, look for pieces constructed from solid wood to ensure quality and durability. If the pieces aren’t the right color, you can always paint or restain them to match your space.

Credit: Polina Kuzovkova/ Unsplash
Thrift Flip Tip

If your solid wood find is painted and you want to restore its natural grain, a heat gun can work wonders to lift away the paint.

Advertisement

2. Consider the Item’s Weight

Weight is another indicator of quality. Whether it’s a piece of furniture or a ceramic vase, heavier items tend to be better made and more durable. On the other hand, it’s worth considering where you will display your thrift find and if that surface can support the item’s weight. For example, if you have a small shelf and find a solid brass figurine to display, you’ll want to make sure the shelf is structurally sound enough to hold its weight (plus anything else you add).

Credit: Kateryna Hliznitsova/ Unsplash
Related: Nostalgic Home Design Trends That Are Staging a Comeback in 2025

3. Opt for Timeless Styles

Thrift stores are a great solution for anyone looking to add trendy pieces to their home while on a budget. But if you’re decorating your space with larger, statement-making items, consider timeless styles as a base and then blend them with modern finds. Dining tables, dressers, sideboards, and even some bookshelves are pieces that could potentially last a lifetime. Sourcing them in more classic styles can help you design a space that looks and feels timeless.

Credit: Kateryna Hliznitsova/ Unsplash
Advertisement

4. Don’t Skip Out on the Baskets

Baskets are some of the best items to thrift and are usually heavily discounted at secondhand stores. When shopping for baskets, look for ones made from real wicker in shapes you can utilize for storage. These baskets are great for organizing larger items such as throw blankets, games, and kids’ toys, as well as smaller, everyday essentials such as keys and remotes.

Credit: ZACHARY STAINES/ Unsplash
Related: How To Use the Rule of Three To Decorate Like an Interior Designer

5. The More Durable, the Better

Similar to quality, durability is key. To ensure longevity, choose pieces made from real, solid materials such as iron, brass, sterling silver, crystal glass, wood, and wicker. When it comes to soft furnishings or rugs, consider natural materials such as wool, cotton, leather, linen, or sisal in lieu of synthetics. And while they’re not always an option, unpainted items may be more desirable than painted ones, as paint can chip and peel with wear and tear.

Credit: Ground Picture/ Shutterstock
Advertisement
Jessie Quinn
Writer
Jessie Quinn is a Los Angeles-based lifestyle journalist with words published in PEOPLE, StyleCaster, Apartment Therapy, The Spruce, Byrdie, and more. She has a Bachelor's Degree in fashion journalism from Academy of Art University and her work spans across many categories, including style, beauty, home, health, crafts, and more.
This article is for general informational purposes only.
Affiliate Disclaimer 
|
Financial Disclaimer
Featured Image Credit:  Nagihan Gülmez/ Pexels | Updated  Jan 27, 2025 |
Advertisement
Food & Drink 2m read
0

This Common Product Is Key for Making Heart-Shaped Baked Goods

Valentine’s Day is the best time to break out your baking supplies and make festive, heart-shaped goodies. Whether you’re whipping up dessert for a Galentine’s get-together or preparing some sweet treats for the office, you can’t go wrong with a dozen (or two) red velvet cupcakes. (Don’t forget to add cream cheese frosting and, of course, Valentine’s Day sprinkles.) To up the ante, make them heart-shaped with this brilliant hack using a popular kitchen staple.

All featured products and deals are selected independently and objectively by the author. House Outlook may receive a share of sales via affiliate links in content.

Valentine’s Day is the best time to break out your baking supplies and make festive, heart-shaped goodies. Whether you’re whipping up dessert for a Galentine’s get-together or preparing some sweet treats for the office, you can’t go wrong with a dozen (or two) red velvet cupcakes. (Don’t forget to add cream cheese frosting and, of course,…

How To Make Heart-Shaped Cupcakes for Valentine’s Day

Shannon Doherty (aka @athomewithshannon on TikTok) shared one of the best hacks for making heart-shaped cupcakes without a heart-shaped pan — all you need are some glass marbles and aluminum foil. Place a cupcake liner in your muffin tin, fill it two-thirds full with batter, and add a marble between the liner and the pan on one side. This should create an indentation where the two curves of the heart meet at the top. Next, add a small, folded-up square of aluminum foil to each side of the cupcake — again, between the liner and pan — to define the heart’s point.

Advertisement

No Marbles? No Problem

If you don’t have any playthings on hand and are wondering how to make heart-shaped cupcakes without marbles, you can achieve a similar effect using just aluminum foil. All you have to do is place cupcake liners in the tin’s cups, fill them with batter, and then place a small ball of foil at the top to create that V-shape. Next, place two flat, folded pieces of foil — similar to Doherty’s hack — on each side to form a point. Then, follow the recipe (or, if you’re like us, the back of the box) instructions for baking.

Related: Why You Should Always Drop a Penny in Your Flower Vase

Once baked, the cupcakes should come out looking like miniature heart-shaped cakes. To enhance the holiday look, dye some frosting pink and use a small spatula to cover the top of the cupcake. Then, add sprinkles or other Valentine’s Day decorations (such as these adorable cupcake toppers), and you have a festive and fun holiday dessert.

Advertisement
Jessie Quinn
Writer
Jessie Quinn is a Los Angeles-based lifestyle journalist with words published in PEOPLE, StyleCaster, Apartment Therapy, The Spruce, Byrdie, and more. She has a Bachelor's Degree in fashion journalism from Academy of Art University and her work spans across many categories, including style, beauty, home, health, crafts, and more.
This article is for general informational purposes only.
Affiliate Disclaimer 
|
Financial Disclaimer
Featured Image Credit:  Lana Wolff/ Shutterstock | Updated  Jan 23, 2025 |
Advertisement
Cleaning 3m read
0

An Easy Way To Remove Baked-On Food in Your Oven

Pumice stones aren’t just for at-home pedicures. Not only do they smooth rough heels, but the pieces of volcanic rock are also a surprisingly effective cleaning tool, helping to tackle all kinds of chores around the house. Pumice stones form when lava cools during an eruption, resulting in a porous, lightweight, and abrasive rock that’s often used to exfoliate dead skin and soften calluses.

All featured products and deals are selected independently and objectively by the author. House Outlook may receive a share of sales via affiliate links in content.

Pumice stones aren’t just for at-home pedicures. Not only do they smooth rough heels, but the pieces of volcanic rock are also a surprisingly effective cleaning tool, helping to tackle all kinds of chores around the house. Pumice stones form when lava cools during an eruption, resulting in a porous, lightweight, and abrasive rock that’s…

But did you know they’re just as effective at scrubbing away built-up grease and food residue inside an oven? When you can’t let that baked-on clump of who-knows-what sit for one more day, break out a pumice stone. They’re affordable and eco-friendly, too, making them a must-have tool for any cleaning kit.

Read on for tips on cleaning your oven with a pumice stone, plus other uses for this natural scrubber. 

Advertisement

How To Clean a Grimy Oven With a Pumice Stone

Cleaning the interior of your oven can feel like a daunting task — and it is — but this simple tool can remove years’ worth of burnt-on food from ovens, stovetops, and barbecue grill grates.

To start, simply wet your pumice stone, then get to work loosening the crusty spots. Keep a cup of warm water nearby and continually dunk the stone to ensure it won’t scratch the oven’s enamel. To put a little less elbow grease into scrubbing, create a cleaning solution using a ratio of 2 cups of water and 1 tablespoon of dish soap. Spray that mixture on greasy, gunky spots and let it soak for five minutes. Then use a pumice stone to scrub off the now-loosened buildup.

Related: This Pantry Staple Helps Keep Stainless Steel Smudge-Free

Tip: Depending on how vigorously you use it, a pumice stone could last anywhere from a couple of weeks to a couple of months. Replace it once it becomes smooth, or at least every two or three months. 

Advertisement

Other Pumice Stone Uses

Stubborn Toilet Stains

Hard-water stains, rust, and mineral buildup, oh my! For a nontoxic cleaning solution for everyone’s least favorite chore — cleaning the toilet — grab a pumice stone and scrub away. (There are ones made specifically for toilet cleaning, with an attached handle.) Your toilet will be sparkling again in mere minutes.

Pet Hair-Covered Upholstery

While you may adore your four-legged friend, the hair they leave behind? Not so much. Good news: A pumice stone is an easy way to gently remove pet hair from upholstered items, such as a couch, car interior, or the armchair that serves as Whiskers’ preferred sunbathing spot. 

With a damp pumice stone, use short strokes, working in the same direction to gather the hair. Keep a vacuum handy too, and use that to suck up the piles of pet hair.

Advertisement
Megan McCarty
Writer
Megan McCarty is a Los Angeles-based writer who covers the fun stuff: design, travel, wellness, beauty, and fashion. She has written for publications including Domino, The Spruce, MyDomaine, Bustle, and Rue Magazine. Her life rules include, but are not limited to, zipper when merging, contribute to your IRA, and do the nice thing.
This article is for general informational purposes only.
Affiliate Disclaimer 
|
Financial Disclaimer
Featured Image Credit:  monkeybusinessimages/ iStock | Updated  Jan 21, 2025 |
Advertisement
Cleaning 2m read
0

3 Clever Ways To Clean With Cornstarch

Like baking soda, cornstarch is a multipurpose ingredient, but you’re probably most familiar with its uses in the kitchen. The thickening agent is a staple in cooking and baking, but did you know it can also be used as a cleaner? That’s right — cornstarch is a pantry essential that packs an impressive punch when it comes to cleaning. From removing oil stains on clothes to degreasing pots and pans, here are three clever ways to clean with cornstarch.

All featured products and deals are selected independently and objectively by the author. House Outlook may receive a share of sales via affiliate links in content.

Like baking soda, cornstarch is a multipurpose ingredient, but you’re probably most familiar with its uses in the kitchen. The thickening agent is a staple in cooking and baking, but did you know it can also be used as a cleaner? That’s right — cornstarch is a pantry essential that packs an impressive punch when…

1. Get Pesky Oil Stains Out of Clothes

Accidents happen, but when it comes to stains on clothes, we all know it’s best to move quickly. To treat fresh oil and grease stains, reach for a box of cornstarch. Add a generous amount of cornstarch to the stains, making sure they’re completely covered, and let it sit for at least 15 minutes, if not a few hours. Once the cornstarch has had enough time to absorb the oil or grease, brush it off and toss the garment in the washing machine. After a wash cycle, your clothes should be stain-free.

Related: 5 Unexpected Ways To Clean With Denture Tablets
Advertisement

2. Polish Silver and Make It Shine

When you’re dealing with silver — whether it’s jewelry, utensils, or decor — a good polish will help it sparkle. There are products meant specifically for polishing silver, of course, but you also can use cornstarch. Cornstarch acts as a gentle abrasive, removing tarnish from silver without scratching it. Mix cornstarch with water to form a paste, then apply it to the silver. Let it sit until the paste is dry. Then, buff it out using a soft cloth.

3. Remove Grease and Grime on Cookware

Grease and grime can be a pain to get rid of, especially on cookware. But cornstarch effectively removes stains and burnt food residue without damaging your pots and pans. Similar to how you would use it as a homemade silver polish, you simply create a paste mixing cornstarch and water, apply the paste to tougher stains and spots, and scrub until they’re gone.

Advertisement
Pauline Lacsamana
Writer
Pauline Lacsamana is a freelance writer and editor who specializes in commerce, home, design, and lifestyle. She has bylines in The Spruce, Business Insider, U.S. News & World Report, Hunker, MyDomaine, Parade, and more.
This article is for general informational purposes only.
Affiliate Disclaimer 
|
Financial Disclaimer
Featured Image Credit:  Yuri Tynyankin/ Shutterstock | Updated  Jan 18, 2025 |