Advertisement
Food & Drink 4m read
0

5 Tips for Ripening Your Favorite Fruits Faster

Imagine you’re preparing to host friends tomorrow when you suddenly realize there’s a major problem: The avocados for your homemade guacamole aren’t ripe enough. You can always run out to the store and buy a few more, but there’s no guarantee those avocados will be ripe either. Short of a miracle, what’s a good host to do?

All featured products and deals are selected independently and objectively by the author. House Outlook may receive a share of sales via affiliate links in content.

Imagine you’re preparing to host friends tomorrow when you suddenly realize there’s a major problem: The avocados for your homemade guacamole aren’t ripe enough. You can always run out to the store and buy a few more, but there’s no guarantee those avocados will be ripe either. Short of a miracle, what’s a good host…

There’s no need to panic — you can speed up the ripening of avocados and other fruits using tools you likely have on hand. Some methods work better than others, depending on the type of fruit and whether you plan to eat it as is or incorporate it into a recipe. Ready to take your avocados from rock-hard to ready-to-eat? Here are five tips for faster fruit ripening.

1. Seal Fruits in a Paper Bag

Most fruits will ripen quicker if sealed inside a paper bag. It’s important to avoid plastic bags, however, as they can trap moisture and cause the fruit to rot. The paper bag method works well for a variety of fruits such as avocados, mangoes, tomatoes, and more. It has to do with trapping ethylene, a naturally occurring plant hormone that causes fruits (and vegetables) to mature. The sealed paper bag will trap that ethylene, expediting the ripening process by a few days.

Credit: VeronikaSmirnaya/ Shutterstock
Bonus Tip

When using the paper bag method, consider adding a ripened apple or a banana to the bag with the fruit you’re trying to ripen. These fruits arepowerful ethylene producers, speeding up the process even further.

Advertisement

2. Put Mangoes in a Bowl of Rice

This hack is based on an age-old technique developed in India, where it’s common to use uncooked white rice to help ripen mangos. While the rice helps trap ethylene, it also absorbs excess moisture, which can prevent spoilage. Grab a bowl big enough to fit the mango (or any other fruit), place the fruit in the bowl, and completely submerge it in uncooked rice. Check the progress every six hours or so, as this method is quite effective. If you leave the mango for too long, it may become too ripe to enjoy.

Credit: S khan23/ Shutterstock
Related: 10 Chef-Approved Storage Hacks To Make Food Last Longer

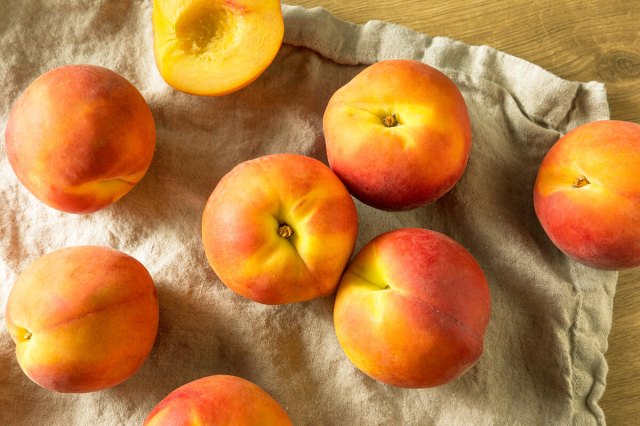
3. Wrap Peaches in Linen

Using one of the aforementioned tips may cause delicate fruits such as peaches to bruise easily. So this helpful hack relies on linen fabric. Lay a linen napkin or kitchen towel on the countertop. Place your peaches stem-side down on the linen, leaving space between each fruit. Finally, cover them with a second linen cloth and let them sit until ripe. You’ll know they’re ready to enjoy when a sweet peach fragrance fills your kitchen.

Credit: funkybg/ iStock
Advertisement

4. Bake Bananas in the Oven

According to All Recipes, a bit of oven time can transform your bananas from hard and inedible to sweet and mushy in a matter of minutes. This may not be the best method if you plan to eat the bananas on their own, as they can become extremely soft. However, it’s an excellent tip if you’re planning to use the bananas as an ingredient in a recipe — banana bread, for instance.

Preheat the oven to 300 degrees Fahrenheit, lay a piece of parchment paper on a baking sheet, and then place your unpeeled bananas on top of it, leaving a couple of inches between each one. Let the bananas bake for 30 minutes — if this isn’t enough time, check on them every 15 minutes thereafter. The peels will turn black, but the bananas themselves will become sweet and mushy, transforming them into the perfect baking ingredient.

Credit: Kokokola/ Shutterstock
Related: 10 Foods You Don’t Need To Wash Before Cooking

5. Utilize Ambient Warmth

Warmer temperatures increase ethylene gas production, so if you’re seeking some rapid ripening, store your fruit bowl in places that get ambient heat. For example, keep a bowl of fruit on top of the refrigerator, which generates heat when running. Or leave the bowl on the windowsill in direct sunlight or adjacent to the stovetop. The warmth will cause the fruit to ripen far quicker than if it were stored in a cool, dark area.

Credit: O_Lypa/ Shutterstock
Advertisement
Bennett Kleinman
Staff Writer
Bennett Kleinman is a New York City-based staff writer for Optimism Media, covering topics for several brands including House Outlook and Better Report. He previously contributed to television programs such as "Late Show With David Letterman" and "Impractical Jokers," and digital publications like The Onion. Bennett is also a devoted New York Yankees and New Jersey Devils fan, and thinks plain seltzer is the best drink ever invented.
This article is for general informational purposes only.
Affiliate Disclaimer 
|
Financial Disclaimer
Featured Image Credit:  bhofack2/ iStock | Updated  Jan 17, 2025 |
Advertisement
Home Improvement 2m read
0

How To Choose the Right Size Drill Bit Every Time

Part of preparing to use your drill is selecting the right size drill bit — you know, the cutting tool that attaches to a drill and rotates to create holes in things.

All featured products and deals are selected independently and objectively by the author. House Outlook may receive a share of sales via affiliate links in content.

Part of preparing to use your drill is selecting the right size drill bit — you know, the cutting tool that attaches to a drill and rotates to create holes in things.

While choosing the wrong size drill bit isn’t the worst thing that could happen during a project, it’s annoying to have to stop what you’re doing to find the appropriate size. If you go too big, there’s a risk of damaging or cracking the material you’re working with. Opt for something too small, and you may have trouble inserting the fastener or cause the drill to overheat.

Related: A Natural Solution to Wood Scratches

If you’ve chosen the wrong drill bit size more often than you care to admit, you’ve come to the right place. We have a trick that will help you choose the correct drill bit every time — and it’s far more accurate than guessing.

Advertisement

Get the Right Fit

Match the drill bit’s size to the solid, central part of the screw, not the spiral threads. You’ll still have to eyeball it a bit, but this method will get you much closer to the proper size. 

The Most Common Types of Drill Bits

While there are many types of drill bits, the three most commonly used are masonry, twist, and woodboring bits.

Masonry Drill Bits: Also known as concrete drill bits, masonry drill bits can drill into hard materials such as concrete, brick, and stone. You might use this type of bit to place an anchor into concrete or other masonry.

Twist Drill Bits: These drill bits are among the most common for general home use and are suitable for drilling into wood, plastic, and softer metals.

Woodboring Drill Bits: Primarily used for construction or woodworking projects, woodboring drill bits create cleaner holes in wood compared to twist bits.

Advertisement
Jill Layton
Writer
Jill Layton started writing professionally when she realized her emails and texts were kinda funny. She’s an affiliate shopping writer and lifestyle contributor for Scary Mommy, Bustle, Mic, and Best Products. She’s the mom of two alarmingly witty kids and the world’s most perfect dog.
This article is for general informational purposes only.
Affiliate Disclaimer 
|
Financial Disclaimer
Featured Image Credit:  Andrzej Rostek/ Shutterstock | Updated  Jan 17, 2025 |
Advertisement
Cleaning 3m read
0

Freshen Up Your Fridge With These Two Ingredients

Placing an open box of baking soda in the back of the refrigerator is a natural way to neutralize any off-putting odors, whether they’re from last week’s leftovers or the blue cheese you were saving for a Cobb salad.

All featured products and deals are selected independently and objectively by the author. House Outlook may receive a share of sales via affiliate links in content.

Placing an open box of baking soda in the back of the refrigerator is a natural way to neutralize any off-putting odors, whether they’re from last week’s leftovers or the blue cheese you were saving for a Cobb salad.

But if you notice a stench emanating from your fridge and don’t want to run out to the store to grab a new box of baking soda, there’s a simple solution using two other ingredients you probably have on hand.

Salt-and-Coffee Fridge Freshener

Combining ground coffee and salt can eliminate bad smells from a fridge. Both ingredients work as natural odor absorbers. Coffee has a porous structure that allows it to absorb moisture and odors. Similarly, salt has a neutral pH level that helps balance odor-causing compounds and also absorbs moisture. Together, coffee and salt bind to odor molecules, preventing them from being released into the air.

Related: The One Thing You Should Do To Make Your Refrigerator Run More Efficiently

If the scent of a particularly pungent food lingers long after it’s been tossed, grab some ground coffee and salt and follow these steps.

Advertisement

How To Get Rid of Foul Refrigerator Odors

Unless you exclusively drink tea, you probably have a bag or two of ground coffee in your pantry. Save the expensive beans for your morning brew and opt for something cheap and cheerful. Combine 1 tablespoon of ground coffee with 1 tablespoon of salt and place it in the center of a rectangular sheet of aluminum foil (we used a 12-by-6-inch piece). Fold the top third of the aluminum foil down, and the bottom third up to form a long, skinny rectangle. Then fold the left side into the center, followed by the right side, to create a sealed pouch. Use a fork or toothpick to punch a few holes through the top layers of foil and place the pouch in an area of your refrigerator where it can absorb and neutralize unpleasant odors. Consider making a few pouches to stick in the door, on a shelf, or in the crisper.

How To Use Coffee and Salt To Eliminate Other Household Odors

You can use a combination of coffee and salt to get rid of bad smells throughout your home. Put the mixture in a container with holes in the lid and place it wherever it’s needed, such as a shoe closet or cat litter box area. Just be sure to replace the coffee and salt every two months for optimal freshness.

Advertisement
Jill Layton
Writer
Jill Layton started writing professionally when she realized her emails and texts were kinda funny. She’s an affiliate shopping writer and lifestyle contributor for Scary Mommy, Bustle, Mic, and Best Products. She’s the mom of two alarmingly witty kids and the world’s most perfect dog.
This article is for general informational purposes only.
Affiliate Disclaimer 
|
Financial Disclaimer
Featured Image Credit:  Bogdan Sonjachnyj/ Shutterstock | Updated  Jan 16, 2025 |
Advertisement
Food & Drink 3m read
0

How To Peel Potatoes Effortlessly When You Don’t Have a Peeler

Potatoes are among the most versatile kitchen staples, but they do have one notable downside: their peels. Sure, they’re nutritious and you can leave them on in some cases. But many recipes call for peeled spuds, a tedious task even with a peeler and especially wasteful if a paring knife must be used instead. So what if we told you there’s an easy, no-waste potato-peeling hack that doesn’t require a peeler? Here’s how it works.

All featured products and deals are selected independently and objectively by the author. House Outlook may receive a share of sales via affiliate links in content.

Potatoes are among the most versatile kitchen staples, but they do have one notable downside: their peels. Sure, they’re nutritious and you can leave them on in some cases. But many recipes call for peeled spuds, a tedious task even with a peeler and especially wasteful if a paring knife must be used instead. So…

The Viral Potato Peeling Hack

This trick isn’t exactly a secret. Plenty of grandmas and restaurant prep cooks know it, and it goes viral pretty regularly on social media. Even if you’re not a seasoned cook, this method is effective and surprisingly simple.

1. Rinse off any dirt from your potatoes, and remove any scabs or blemishes.

2. Bring a large pot of water to a boil.

3. Use a sharp knife to score the potato lightly around its middle. Don’t cut into the potato itself; you just want to pierce the skin.

4. Carefully drop the potatoes into the boiling water. 

5. Cook the potatoes until they’re tender all the way through; check with a wooden skewer or the tip of a paring knife. 

6. Drain the potatoes and rinse them in cold water. For quicker cooling, you can leave them in the cold water for a few minutes.

That’s it! Once the potatoes have cooled enough to handle, the peels will slide off easily. They may or may not come off all in one piece, but if not, you will easily be able to pick off any stray bits of skin that are left.

Advertisement

Weighing the Pros and Cons

There are upsides and downsides to this hack. To begin with, boiling your potatoes whole takes longer. Like … a lot longer. A pot of big russets can take 30 to 45 minutes, for example. But — and this is important — that’s unattended time, not hands-on like traditional peeling. You can simply let the potatoes do their thing while you continue with meal prep.

Related: Use the “Upside-Down” Method for Cutting Bell Peppers

The hack works better with thick-skinned, old crop potatoes (those that have been stored for several weeks or months) rather than new potatoes or baby potatoes. Their thinner skins may not slide off as easily. Also, if your potatoes have lots of eyes or blemishes, the skin will tend to stick at those places and need to be peeled away with a fingernail.

That said, it’s still a great hack, especially if you don’t have a peeler. And while boiling your potatoes whole takes longer, an added benefit is that they’ll absorb less water while they cook. That makes for better potato salads and hash browns, and you can forget about watery mashed potatoes.

Advertisement
Fred Decker
Writer
Fred Decker is a trained chef and former restaurateur. Since closing his restaurants over a decade ago he has been a prolific freelance writer, publishing several thousand articles on dozens of high-volume websites including Taste Of Home, Hunker, Tasting Table, Week&, eHow, and GOBankingRates. He lives on a rural acreage shared with a big garden, chickens, rabbits, and grandkids.
This article is for general informational purposes only.
Affiliate Disclaimer 
|
Financial Disclaimer
Featured Image Credit:  batjaket/ Shutterstock | Updated  Jan 16, 2025 |
Advertisement
Cleaning 2m read
0

A Quick Fix for Lingering Cooking Smells

That French onion soup smelled delicious while it cooked, but now the scent of onions and Gruyère hangs in the air. Depending on the dish, food odors can linger for a few days to a week. It’s an unpleasant experience, to say the least, especially when it comes to potent foods such as fish or meat.

All featured products and deals are selected independently and objectively by the author. House Outlook may receive a share of sales via affiliate links in content.

That French onion soup smelled delicious while it cooked, but now the scent of onions and Gruyère hangs in the air. Depending on the dish, food odors can linger for a few days to a week. It’s an unpleasant experience, to say the least, especially when it comes to potent foods such as fish or…

The next time you cook an aromatic meal, there’s a trick that will get the funk out without masking the smell with air fresheners or scented candles.

The trick couldn’t be simpler; you’re going to kick yourself for not knowing it sooner and dealing with the odors until they dissipated on their own. The solution? Simmering white distilled vinegar.

Banish Cooking Odors From Your Kitchen

To cover up lingering odors from cooking or other sources, simmer a pot of vinegar on the stove. Grab a small saucepan and pour a cup of water and half a cup of white distilled vinegar into the pan. Bring it to a boil before lowering the heat to a simmer, letting it work its magic for about 10 to 15 minutes. For particularly stubborn odors, you can simmer the solution even longer, or until it has nearly evaporated.

Advertisement

When vinegar is heated on the stovetop, its acetic acid is released as a vapor, which works to neutralize smells by attaching to the odor-causing molecules and changing their chemical makeup. If the stench has penetrated other rooms, such as your walk-in pantry or living room, you can take the simmering saucepan from room to room (wearing an oven mitt, of course) to counteract those odors, too.

Related: The Fix for Unpleasant Upholstery Odors Is in Your Liquor Cabinet

As you probably know, vinegar itself doesn’t smell great — it’s actually pretty terrible. But the vinegar scent will be temporary and won’t linger, and that makes it a better option than smelling the fish you had for dinner two nights ago.

Advertisement
Jill Layton
Writer
Jill Layton started writing professionally when she realized her emails and texts were kinda funny. She’s an affiliate shopping writer and lifestyle contributor for Scary Mommy, Bustle, Mic, and Best Products. She’s the mom of two alarmingly witty kids and the world’s most perfect dog.
This article is for general informational purposes only.
Affiliate Disclaimer 
|
Financial Disclaimer
Featured Image Credit:  Dale Clarke/ Shutterstock | Updated  Jan 23, 2025 |
Advertisement
Gardening 5m read
0

6 Signs You’re Overwatering Your Plants (And How To Save Them)

Houseplants, in a way, are like undemanding pets. They bring life into our living spaces but need our care in order to flourish. Unlike dogs or cats, however, they aren’t very good at letting us know what they want. This expertise comes with time, and many people give up too soon, convinced they’re not cut out for plant parenthood. Overwatering is one of the most common mistakes indoor gardeners make, so that’s the first thing you should rule out. Here are six signs you’re giving your plants too much to drink, and a few ways to correct the problem.

All featured products and deals are selected independently and objectively by the author. House Outlook may receive a share of sales via affiliate links in content.

Houseplants, in a way, are like undemanding pets. They bring life into our living spaces but need our care in order to flourish. Unlike dogs or cats, however, they aren’t very good at letting us know what they want. This expertise comes with time, and many people give up too soon, convinced they’re not cut…

The Top 6 Signs You’re Overwatering Your Plants

Plants show water stress in a lot of ways, depending on factors such as plant type, cultivar, and soil. You’ll learn more over time, but these six signs are the ones you’re most likely to observe.

Credit: Kaboompics/ Pexels

1. The Soil Feels Wet

Plants vary in how moist they like their soil, but “moist” is the key word here. The soil should feel just slightly moist — never wet or saturated. Succulents, for example, prefer dry, well-draining soil. A good rule for most plants is to water only when the top inch of soil is dry; many succulents, however, should dry out completely between waterings.

2. You Have Fungus Gnats

If you start seeing clouds of tiny gnats around your houseplants, that’s a strong indicator of overwatering. These are fungus gnats, and they love moist environments. While the gnats themselves are harmless, their larvae unfortunately have a taste for plant roots, and can damage or kill your houseplants.

Advertisement

3. Your Plant Is Visibly Rotting at Its Crown

Many stemmed houseplants are prone to rotting at the soil line, while clustered plants tend to rot at the crown, where their leaves or stems emerge. This is also a “smoking gun” symptom of overwatering.

Related: Tips for Keeping Your Houseplants Healthy All Winter Long

4. Your Plant’s Leaves Are Getting Blotchy

Overwatered plants are prone to various infections. These usually appear as light or dark brown blotches, typically with a yellow ring around them.

Advertisement

5. Leaves Are Limp, Yellow, or Dropping

This may be the most telltale sign of all. The leaves of overwatered plants may become limp and yellow, and the plant will drop leaves. You’ll see this mostly with lower and interior leaves (those close to the stem), and it will include apparently healthy leaves as well as the limp and yellow ones. Drought-stressed plants drop leaves too, but you can usually tell the difference pretty easily. Leaves of under-watered plants turn brown and crispy instead of yellow and limp, and the soil will, of course, be dry.

6. The Soil Is Moldy

This is another sure giveaway. If there’s any kind of mold, mildew, or algae visible on the surface of your soil, it’s too wet.

Advertisement

How To Save an Overwatered Plant

There’s a saying that “if you find yourself in a hole, the first thing is to stop digging.” With houseplants, the equivalent is to put down the watering can and give your plants a chance to recover. For plants that are only just beginning to look distressed, letting the soil dry out for several days may remedy the situation.

For badly affected plants, you’ll need to take some proactive steps to save them. Your local extension service may be able to advise you about specific care for certain plants (succulents and orchids, for example, can be pretty finicky). For most other houseplants, some combination of the following actions can help.

Credit: DimaBerlin/ Shutterstock
Advertisement

• Add drainage holes, if your pot doesn’t already have them. If you’re OK with the weight of terra-cotta pots, they can help by wicking moisture from the soil and allowing it to evaporate.

• If the plant is sturdy enough, support it with one hand and gently roll the pot on its side a few times with the other. This can loosen up the soil and let in some air.

• Tackle adult fungus gnats with yellow sticky traps (get ’em before they breed). A piece of raw potato, set cut side down on the soil, will attract the larvae and can be replaced and discarded every few days. Bacillus thuringiensis (Bt) and a couple of other natural controls have proved to work well.

Related: This Spice Is a Natural Fungicide for Houseplants

• Scoop the top layer of soil away from the roots, if you can, and replace it with fresh, pasteurized potting soil. This can work for mold and fungi, and helps with fungus gnats too.

• Repot the plant entirely. Slide it from its pot and carefully brush or rinse the soil from its roots. Cut away any visibly damaged or rotting roots (because the rot will spread), then repot the plant in fresh soil.

You may still lose some of your plants, depending on the level of stress, but these interventions can greatly improve their chances. 

Advertisement
Fred Decker
Writer
Fred Decker is a trained chef and former restaurateur. Since closing his restaurants over a decade ago he has been a prolific freelance writer, publishing several thousand articles on dozens of high-volume websites including Taste Of Home, Hunker, Tasting Table, Week&, eHow, and GOBankingRates. He lives on a rural acreage shared with a big garden, chickens, rabbits, and grandkids.
This article is for general informational purposes only.
Affiliate Disclaimer 
|
Financial Disclaimer
Featured Image Credit:  ROCKETMANN TEAM/ Pexels | Updated  Jan 15, 2025 |
Advertisement
Home Improvement 2m read
0

A Natural Solution to Wood Scratches

There’s something so timeless about wood floors and furniture. Maybe it’s their distinctive grain patterns, naturally warm hues, or decorative versatility. In any case, while wood surfaces are durable and fairly easy to maintain, they’re still prone to occasional scratches, whether from moving furniture or a pet’s sharp claws. Luckily for us, nuts are a natural and simple solution to reviving wood floors and furniture — and they’re a healthy snack, too.

All featured products and deals are selected independently and objectively by the author. House Outlook may receive a share of sales via affiliate links in content.

There’s something so timeless about wood floors and furniture. Maybe it’s their distinctive grain patterns, naturally warm hues, or decorative versatility. In any case, while wood surfaces are durable and fairly easy to maintain, they’re still prone to occasional scratches, whether from moving furniture or a pet’s sharp claws. Luckily for us, nuts are a…

Go Nuts on Wood Scratches

You can repair minor scratches on wood using the meat of walnuts, pecans, and macadamias — basically any nut that’s rich in natural oils. First, clean the wood surface thoroughly using a microfiber cloth and suitable cleaning spray, or a solution of warm water and a few drops of dish soap.

Related: Remove Water Stains From Wood Furniture With This One Ingredient

Once the floor or furniture item is clean, take the nut of your choice and gently rub it over the scratch, working from multiple angles. Let it sit for a few minutes, so the oil from the nut soaks into the scratch, then buff the area with a clean, dry microfiber cloth. This should conceal the scratch and make the wood surface look like new.

Advertisement

How It Works

What appears to be a magic trick is, in fact, simply nature at work. Rubbing walnuts, pecans, or macadamias on scratches fills the indentations with natural oils from the nuts.

Before you run off to the pantry, though, know that there are a few limitations to this hack. Using nuts to fix wood is best for surface-level scratches and lighter wood finishes. If you’re dealing with a deep scratch, the nut oils alone may not completely fill it, and you may need a specialized wood filler. The same goes for scratches in high-traffic areas of the home. Since those spots get more use, the oils may wear away faster, requiring occasional touch-ups. As for dark wood, the lighter color of the nut oil may not blend as well.

Advertisement
Pauline Lacsamana
Writer
Pauline Lacsamana is a freelance writer and editor who specializes in commerce, home, design, and lifestyle. She has bylines in The Spruce, Business Insider, U.S. News & World Report, Hunker, MyDomaine, Parade, and more.
This article is for general informational purposes only.
Affiliate Disclaimer 
|
Financial Disclaimer
Featured Image Credit:  Levent Konuk/ Shutterstock | Updated  Jan 14, 2025 |
Advertisement
Cleaning 3m read
0

The Best Way To Clean Your Mattress

You don’t have to wait for spring to refresh your home and tackle some of the not-so-fun projects you’ve been putting off. If cleaning your mattress is on your to-do list, rest assured that it’s actually a lot easier than it seems. All you need is a cup of baking soda and a few drops of essential oils to freshen up your mattress.

All featured products and deals are selected independently and objectively by the author. House Outlook may receive a share of sales via affiliate links in content.

You don’t have to wait for spring to refresh your home and tackle some of the not-so-fun projects you’ve been putting off. If cleaning your mattress is on your to-do list, rest assured that it’s actually a lot easier than it seems. All you need is a cup of baking soda and a few drops…

It’s easy to forget about deodorizing your mattress, even during a top-to-bottom cleaning of your bedroom. But giving your bed a refresh every six months can help extend the life of your mattress. A steam clean is one of the best ways to deep clean your mattress, but if you don’t have time for that (or your mattress isn’t in need of a spa day), there are still ways to clean it without getting it wet — and the best way might already be hiding in your pantry.

How To Clean Your Mattress With Baking Soda

TikTok creator Corinne Burghardt — aka Slay at Home Mother —  uses baking soda and essential oil. All you have to do is add one cup of baking soda to a container (Tupperware works great) with 10 drops of essential oil. You can choose any favorite essential oil scent, though if you want a fresh, clean scent, try a mix of lemon and clove, lavender and eucalyptus, or a premade blend such as Saje Refresh, doTERRA On Guard, NOW Clear the Air, or Young Living Thieves.

Advertisement

After mixing the essential oil drops into the baking soda, gently sprinkle the mixture across the top of your mattress and let it sit for one hour. Then, use an old or inexpensive vacuum to clean up the baking soda. This is important to note as we previously reported on the potential for baking soda to clog vacuum filters and reduce their performance.

Related: This Is the Secret to Fluffy, Luxury Hotel-Style Bedding

Baking soda offers several benefits: It absorbs moisture to prevent mold, mildew, and bacteria growth; it gets rid of bad smells by reacting with odor molecules; and its mildly abrasive texture loosens dust and dirt for easier vacuuming. Applying baking soda to your mattress twice a year can help reduce the buildup of sweat, body oils, and other impurities, making it a worthwhile addition to your cleaning schedule.

One Last Tip

Although baking soda is ineffective against allergens, regular vacuuming can help remove dust mites, mold spores, and pet dander from your mattress. Use a vacuum with a HEPA filter and the upholstery attachment for a damage-free deep clean.

Advertisement
Jessie Quinn
Writer
Jessie Quinn is a Los Angeles-based lifestyle journalist with words published in PEOPLE, StyleCaster, Apartment Therapy, The Spruce, Byrdie, and more. She has a Bachelor's Degree in fashion journalism from Academy of Art University and her work spans across many categories, including style, beauty, home, health, crafts, and more.
This article is for general informational purposes only.
Affiliate Disclaimer 
|
Financial Disclaimer
Featured Image Credit:  Nick Alias/ Shutterstock | Updated  Jan 10, 2025 |
Advertisement
Cleaning 2m read
0

How To Keep Your Toilet Brush Germ-Free

The culprit of one of the most common cleaning mistakes is likely lurking in your bathroom. Look to the side of your toilet. You found it: the toilet bowl brush.

All featured products and deals are selected independently and objectively by the author. House Outlook may receive a share of sales via affiliate links in content.

The culprit of one of the most common cleaning mistakes is likely lurking in your bathroom. Look to the side of your toilet. You found it: the toilet bowl brush.

Toilet brushes and their caddies are a common fixture in most bathrooms. What you may not realize is this seemingly benign brush can be the cause of germs, mold, and perhaps that mystery smell you’ve been trying to identify, too. It’s not just gross; it’s a potential health hazard.

Don’t throw your toilet brush away just yet, though — it’s crucial for a clean, sanitized toilet bowl. The problem arises if you’re storing a wet toilet brush in its caddy. That’s basically asking for bacteria growth and unpleasant odors, which thrive in moist environments.

Advertisement

How To Keep Your Toilet Brush Germ-Free

Imagine you’ve just cleaned your toilet and are wielding a wet toilet brush in your hand. If you can’t put it back in its holder yet, where should it go? It’s simple: Air-dry the brush by wedging the handle between the lowered seat and the rim of the toilet for at least an hour.

Related: Cleaning Your Mirrors This Way Will Prevent Bathroom Fog

Once it’s dry, you can return the brush to its container. This keeps bacteria at bay. It also helps you get more cleaning mileage out of your toilet brush. Plan to replace your toilet brush at least twice a year regardless.

How To Clean Your Toilet Brush

Your toilet needs to be cleaned regularly, and so does your toilet brush. (And no, a swirl through clean toilet water doesn’t cut it.) Be sure to wash your toilet brush at least once every couple of weeks. To do so, spray the brush head with 3% hydrogen peroxide, a powerful antibacterial disinfectant that helps eliminate odors. Let the brush sit for 10 minutes to allow the chemical to work, then rinse and air-dry it. Don’t forget to clean the brush holder too. So long, bacteria! 

Advertisement
Megan McCarty
Writer
Megan McCarty is a Los Angeles-based writer who covers the fun stuff: design, travel, wellness, beauty, and fashion. She has written for publications including Domino, The Spruce, MyDomaine, Bustle, and Rue Magazine. Her life rules include, but are not limited to, zipper when merging, contribute to your IRA, and do the nice thing.
This article is for general informational purposes only.
Affiliate Disclaimer 
|
Financial Disclaimer
Featured Image Credit:  Vitalii Stock/ Shutterstock | Updated  Jan 10, 2025 |
Advertisement
Cleaning 5m read
0

10 Things You Should Never Put Down Your Garbage Disposal

Garbage disposals are a godsend when it comes to cleaning up after a meal. It’s as if there’s a mythical creature living underneath your sink with an endless appetite for food scraps. But be careful — despite their convenience and simplicity, garbage disposals are vulnerable to breaking down, and repairs can be difficult and costly. This is why you should always take preventive measures to keep your machine running smoothly and efficiently, and it all starts with knowing which items you should never put down the garbage disposal.

Garbage disposals are a godsend when it comes to cleaning up after a meal. It’s as if there’s a mythical creature living underneath your sink with an endless appetite for food scraps. But be careful — despite their convenience and simplicity, garbage disposals are vulnerable to breaking down, and repairs can be difficult and costly.…

1. Animal Bones

Some of the most common culprits behind broken garbage disposals are animal bones, which are far too hard and dense for the machine to properly break down. This isn’t to say that all bones will necessarily destroy the mechanism. Small chicken wings or softer fish bones aren’t likely to cause too much damage if one accidentally slips in there. But larger bones like beef ribs can wreak havoc on the device.

Credit: dba87/ Shutterstock

2. Paint

You may think you can pour paint down the drain like any other liquid. But in reality, paint hardens over time, which can cake the disposal and prevent it from functioning properly. This is especially true with oil- and latex-based paints, which may stick to the disposal’s interior and become difficult to remove. There are also environmental concerns with putting paint into the garbage disposal, and it could contaminate the community’s water systems. Instead, dispose of leftover paint at a designated hazardous waste site in your town, or solidify leftover latex paint by mixing it with cat litter before throwing it away.

Advertisement

3. Absorbent Grains

Bread, pasta, rice, and other porous grains easily absorb water and expand in size. This can lead to dense clogs within the disposal that prevent the impellers from spinning. While a few pieces of spaghetti or a single slice of bread probably won’t do significant damage, it’s best to avoid making a habit of putting grains in the garbage disposal. Just use the regular trash instead.

Credit: Tatjana Meininger/ Shutterstock

4. Coffee Grounds

After brewing a pot of coffee, the grounds turn into a gunky paste. When tossed into the garbage disposal, that goop can adhere to the appliance like glue, slowing it down or stopping it from working altogether. The more coffee grounds you dispose of, the larger the blockage will become, making it time-consuming and difficult to extricate the device.

Related: Garbage Disposal Cleaning Hacks That Actually Work
Advertisement

5. Egg Shells

You may have heard the persistent — and let’s be clear, incorrect — rumor that egg shells can sharpen the blades of a garbage disposal. But there are two things wrong with that idea: First, garbage disposals don’t have blades; instead, they have blunt lugs or impellers. Second, eggshells contain a thin membrane that can wrap around the spinning mechanism, preventing it from working properly.

Credit: Avelina/ Shutterstock

6. Fibrous Produce

Fibrous produce — think celery, banana peels, pumpkin, and corn husks — contains many long, spindly fibers that look and sometimes function like pieces of string. When tossed into the disposal, these fibrous strands can get tangled around the mechanism until the machine jams.

Advertisement

7. Grease

Grease may look like a liquid, but it congeals over time, causing serious blockages if poured down your kitchen plumbing. Instead, allow it to cool, soak it up with a paper towel, and throw it in the trash.

Credit: Octavian Lazar/ Shutterstock

8. Shellfish

Much like land animal bones, hard pieces of shellfish can also do a number on your garbage disposal. Lobster, crab, oyster, and clam shells can damage the appliance in no time at all. Even softer shells such as shrimp tails can clog the device, causing a huge headache. So while the meat from these creatures is OK to put in the disposal, check to see if there are any remaining bits of shell before scraping your plate clean.

Related: 10 Chef-Approved Storage Hacks To Make Food Last Longer
Advertisement

9. Onion Skin

While the inside of an onion is no problem for the garbage disposal, its thin exterior membrane is something to be wary of. Just beyond the dry outermost layer of an onion, you’ll find a thin and often slimy membrane. Much like the membrane from an eggshell, this can become entangled in the spinning mechanism, causing the device to jam.

Credit: Tatiana_Pink/ Shutterstock

10. Any Nonfood Item

Your garbage disposal is meant for organic food materials only, and it should never be used like a normal garbage can. This means no paper towels, no plastic wrap, no sponges, and no medications. Putting nonfood items down there is, quite simply, a clog waiting to happen. If you can’t eat it, you can’t put it down the garbage disposal — plain and simple.

Although garbage disposals are designed to make our lives easier and cut down on cleaning time, they should not be treated like bottomless pits. Take the time to separate problem foods to avoid a clog, or worse, a broken machine that needs to be replaced.

Advertisement
Bennett Kleinman
Staff Writer
Bennett Kleinman is a New York City-based staff writer for Optimism Media, covering topics for several brands including House Outlook and Better Report. He previously contributed to television programs such as "Late Show With David Letterman" and "Impractical Jokers," and digital publications like The Onion. Bennett is also a devoted New York Yankees and New Jersey Devils fan, and thinks plain seltzer is the best drink ever invented.
This article is for general informational purposes only.
Affiliate Disclaimer 
|
Financial Disclaimer
Featured Image Credit:  Denis Shevchuk/ iStock | Updated  Jan 8, 2025 |