Advertisement
Food & Drink 3m read
0

This Potato-Peeling Hack Is a Holiday Time-Saver

Peeling potatoes is a mundane yet time-consuming task that often results in wayward peels finding their way into the nooks and crannies of your kitchen. Although boiled potatoes can be enjoyed year-round — no summer cookout is complete without a classic potato salad — peeling an entire sack of potatoes is particularly burdensome when preparing an elaborate holiday meal with multiple dishes.

All featured products and deals are selected independently and objectively by the author. House Outlook may receive a share of sales via affiliate links in content.

Peeling potatoes is a mundane yet time-consuming task that often results in wayward peels finding their way into the nooks and crannies of your kitchen. Although boiled potatoes can be enjoyed year-round — no summer cookout is complete without a classic potato salad — peeling an entire sack of potatoes is particularly burdensome when preparing an…

The next time you’re handed a 5-pound bag of russet potatoes and told, “Here, peel these for me,” remember this time-saving hack that yields fluffy mashed potatoes without the skin. (We’ll share a bonus hack for those, too.)

Related: 3 Proven Hacks for Cutting Onions Without Crying
What You’ll Need

Cooling rack

Spatula

Mixing bowl

Tongs

Advertisement

No-Peel Potato Hack

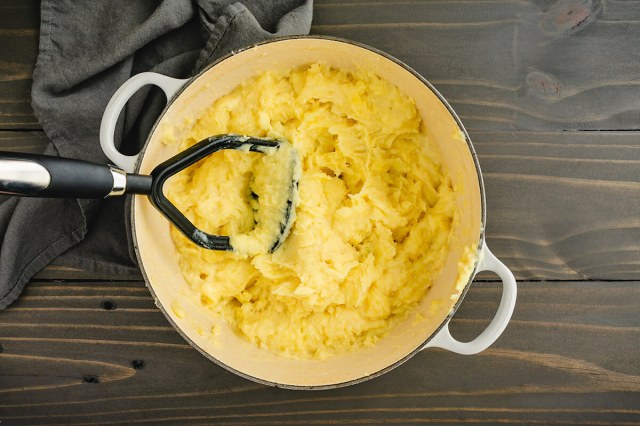
Put down your trusty swivel peeler and leave the potato skin intact. Cut the raw potatoes into halves or 2-inch cubes, depending on their original size. (Cutting potatoes before boiling helps ensure even cooking and removes excess starch.) Next, place your spuds in a pot of generously salted boiling water and cook until fork-tender. Drain the water and store your boiled potatoes in a large bowl.

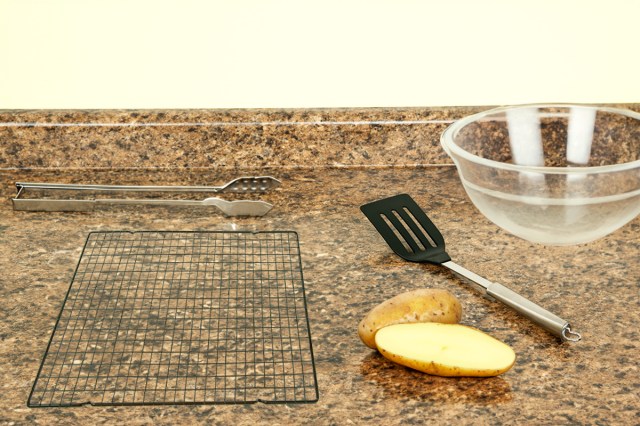
Here’s where the hack comes into play: Grab a wire cooling rack with a grid pattern and place it over a mixing bowl. Use a pair of tongs to transfer a few hot potatoes to the cooling rack. With a spatula (we recommend this turner-style one with a soft silicone head), press down gently on the potatoes to push them through the grates. The skins will stick to the cooling rack, while the rest of the potato slides into the bowl. You can then use the spatula to remove the skins, placing them in a separate bowl.

Now, some people might say cleaning a cooling rack is harder than cleaning a vegetable peeler. But if you give the cooling rack a quick scrub and run it through the dishwasher, you should have no problem at all. For some, it’s a price worth paying to avoid accidentally dropping a potato into the depths of the garbage can.

Don’t Toss Those Potato Skins

If you’re looking to reduce food waste, there are several delicious ways to reuse those potato skins. Toss them in oil, add your favorite spices, and air fry them at 425 degrees Fahrenheit for about 10 minutes. Now you have a crispy topping for a salad, or a savory snack to pair with dip. 

Advertisement
Kelsey Morrison
Staff Editor
Kelsey Morrison is the Staff Editor of House Outlook. She has been covering all things home-related for over a decade, including real estate, interior design, commerce, and a slew of other lifestyle topics. Kelsey previously worked as a commerce editor for World of Good Brands (eHow.com and Cuteness.com) and as an associate editor for Livabl.com. She describes her personal design style as 1970s ski chalet-chic and has a thing for latch-hook tapestries.
This article is for general informational purposes only.
Affiliate Disclaimer 
|
Financial Disclaimer
Featured Image Credit:  DonNichols/ iStock | Updated  Oct 29, 2024 |
Advertisement
Decorating 3m read
0

A Designer’s Trick for Choosing the Right Nightstands

Nightstands are small but mighty. They’re also an essential piece of furniture in any bedroom. Nightstands balance pretty with practical, providing an opportunity to show off your interior design style while also offering a place to set a glass of water, that book you’ve been meaning to read, and — let’s face it — probably your phone.

All featured products and deals are selected independently and objectively by the author. House Outlook may receive a share of sales via affiliate links in content.

Nightstands are small but mighty. They’re also an essential piece of furniture in any bedroom. Nightstands balance pretty with practical, providing an opportunity to show off your interior design style while also offering a place to set a glass of water, that book you’ve been meaning to read, and — let’s face it — probably…

How Tall Should a Nightstand Be?

According to interior decorator and TikTok creator Kiva Brent (@kivabrent), there’s one key to nailing the look of a nightstand. It must reach a certain height in relation to your bed, or your whole bedroom’s design will feel off. In a recent TikTok, Brent shared a simple trick for balancing bed-to-nightstand proportions: Choose an option that’s the same height as your mattress (when it’s on your bed), with a little wiggle room in either direction — plus or minus 4 inches. 

This is as much for practicality as it is for aesthetics. If your nightstand is too low, you may struggle to reach your blaring alarm each morning. A nightstand that’s too tall presents a similar problem; reaching up is equally uncomfortable. In either case, a nightstand that’s too short or too tall will also look out of place.

Advertisement

Width Matters, Too

The wider your bed, the wider your nightstands should be. This will ensure they feel proportional to your bed, not dinky or overpowering. Follow these general width guidelines:

• Twin bed: 17 to 21 inches wide

• Full or queen bed: 21 to 28 inches wide

• King bed: 24 inches wide and up

How To Make Your Current Nightstand Work

If a furniture shopping spree isn’t in your near future, there are plenty of easy and inexpensive ways to revamp your current nightstands. A too-short nightstand could be raised with the addition of feet. Another option is to top a petite nightstand with a stone slab, which is an elegant way to give it additional height and a totally new look. However, the easiest way to elevate a nightstand’s surface is to style it with a stack of books, topped with a catchall tray to organize everyday items such as lip balm and jewelry.

Related: How To Use the Rule of Three To Decorate Like an Interior Designer

If your bed is so tall you’re having trouble finding a nightstand that reaches, try a three-drawer dresser instead. A dresser will provide height and storage. And can you ever really have enough storage?

Advertisement
Another Helpful Tip

When browsing nightstand options, consider how much surface area you’ll need. What will live on your nightstand — an alarm clock, a lamp, a framed family photo? You’ll want a nightstand with enough surface area to accommodate all of those bedside essentials.

Advertisement
Megan McCarty
Writer
Megan McCarty is a Los Angeles-based writer who covers the fun stuff: design, travel, wellness, beauty, and fashion. She has written for publications including Domino, The Spruce, MyDomaine, Bustle, and Rue Magazine. Her life rules include, but are not limited to, zipper when merging, contribute to your IRA, and do the nice thing.
This article is for general informational purposes only.
Affiliate Disclaimer 
|
Financial Disclaimer
Featured Image Credit:  Hans Isaacson/ Unsplash+ | Updated  Oct 28, 2024 |
Advertisement
Food & Drink 6m read
0

Kitchen Tools You’ll Need To Host the Perfect Thanksgiving Dinner

Between scrambling for the last turkey at the grocery store and decluttering the neglected spare bedroom, hosting Thanksgiving can be a pretty stressful experience. But there are steps you can take to make the day less exhausting, and it all starts long before you pop the turkey into the oven.

All featured products and deals are selected independently and objectively by the author. House Outlook may receive a share of sales via affiliate links in content.

Between scrambling for the last turkey at the grocery store and decluttering the neglected spare bedroom, hosting Thanksgiving can be a pretty stressful experience. But there are steps you can take to make the day less exhausting, and it all starts long before you pop the turkey into the oven.

Stocking up on essential kitchenware ahead of time will facilitate an easier cooking process on the day of. Whether you already have some of these supplies lying around, or you’ve never hosted Thanksgiving before and are starting from scratch, here are seven kitchen tools that will help you prepare the perfect Thanksgiving feast.

Roasting Pan

A roasting pan is essential for big holiday gatherings, whether you’re whipping up a Thanksgiving turkey, a Christmas goose, or even an Easter ham. When it comes to material, stainless steel roasting pans are the way to go, as they provide durability while also being easy to clean. This Cuisinart 16-inch roasting pan is a reliable option, as it’s large enough to fit a substantial bird in the event you’re cooking for a crowd. The stainless steel provides even heat distribution, and the elevated metal rack allows fat to drain off the turkey into the pan below, which you can use to make a flavorful gravy.

Credit: jbreeves/ iStock
Related: 7 Fixes for Common Thanksgiving Dinner Problems

Turkey Fryer

While roasted turkeys are a Thanksgiving staple, you may want to switch things up and prepare the bird a different way. We recommend deep frying your turkey and using this propane-powered turkey fryer from Char-Broil to do so. Deep frying the turkey offers a wide range of benefits that traditional roasting fails to provide. First and perhaps most notably, it’s quicker — you can cook an entire bird in less than an hour. The oil also produces crispy, crackling skin that’s absolutely delicious.

Credit: Chad Robertson Media/ Shutterstock
Be Careful

Deep frying the turkey comes with its fair share of safety concerns, so here are some tips to avoid disaster.

Deep fry the turkey in a well-ventilated outdoor area, such as a driveway.

Keep the fryer away from anything flammable, like a wooden deck or your home.

Carefully lower the turkey into the fryer to avoid hot oil splashback.

• Don’t overfill the fryer with too much oil.

• Don’t use a frozen turkey, as it may explode.

• Have a fire extinguisher on hand in case of an emergency.

Advertisement

Pie Dish

Thanksgiving isn’t complete without a pie ( … or three or seven), so it’s important to stock up on plenty of pie dishes. This sleek glass pie plate from OXO is microwave-safe, oven-safe, and dishwasher-safe, and it can be transferred from the cool freezer to the hot oven without cracking. It also comes with a tight-fitting lid to protect your freshly baked pecan pie en route to Friendsgiving or keep it warm while you take a post-dinner, tryptophan-induced nap.

Credit: Cavan-Images/ Shutterstock
Related: 3 Ways To Chill Wine Fast When You’re in a Pinch

Meat Thermometer

Just because a turkey looks crisp and golden on the outside doesn’t mean that it’s heated all the way through. There’s arguably nothing worse than taking a turkey out of the oven and carving into it, only to realize that it’s completely raw. Rather than risk sending your guests home with salmonella poisoning, use a meat thermometer to guarantee the turkey has reached an internal temperature of 165 degrees. This NutriChef meat thermometer not only gives accurate temperature readings but also features Bluetooth technology so you can check the temp from an app on your smartphone. Forget about opening the oven every few minutes to check — you can keep tabs on the turkey from the comfort of your couch.

Credit: lisegagne/ iStock
Advertisement

Carving Board and Knife

When it’s finally time to carve the turkey, a standard cutting board and a dull knife simply won’t do. You’ll need tools that are sturdy enough to handle the job, like this extra-large bamboo carving board from Greener Chef. This durable carving board comes with built-in spikes that keep the turkey stationary as you cut it, as well as a reservoir and pour spout to catch any natural juices. As for the knife, this electric carving knife from Hamilton Beach features a 120-watt motor and a serrated, stainless steel blade to easily cut through turkey, bread, or even soft cheeses. It also comes with a carving fork for added stability, ensuring the turkey won’t go flying off the counter as you cut into it.

Credit: Pawel Kacperek/ iStock
Related: 3 Proven Hacks for Cutting Onions Without Crying

Casserole Dishes

Between the mashed potatoes, green bean casserole, sweet potato casserole, stuffing, mac and cheese, and roasted vegetables — we could go on — making Thanksgiving dinner may require more dishes than you currently have in your cupboards. We recommend stocking up on basic casserole dishes, like this four-piece set from NutriChef. These glass, rectangular dishes are oven-safe and dishwasher-safe, making post-dinner cleanup a cinch. They come in a variety of sizes, ranging from 0.9 to 3.2 quarts, and boast BPA-free lids so you can easily store any leftovers.

Credit: Pixel-Shot/ Shutterstock
Advertisement

Gravy Separator

Gravy is essential for any Thanksgiving dinner, but the fattier it is, the more likely it is to ruin an otherwise delicious plate of food. Enter the gravy separator — an incredible tool that removes excess fat from up to 4 cups of gravy. Just pour your gravy through the strainer to remove large chunks, then allow the fat to settle at the top. Once the fat has fully separated, use the bottom release function to pour your greaseless gravy into a serving bowl.

Credit: LauriPatterson/ iStock

Once you have all of these tools at your disposal, preparing Thanksgiving dinner will be a breeze. Your guests will be delighted by how organized you seem and how delicious everything tastes. In fact, they’ll probably have such a wonderful time that they’ll ask you to host again next year — whether you were planning to or not.

Advertisement
Bennett Kleinman
Staff Writer
Bennett Kleinman is a New York City-based staff writer for Optimism Media, covering topics for several brands including House Outlook and Better Report. He previously contributed to television programs such as "Late Show With David Letterman" and "Impractical Jokers," and digital publications like The Onion. Bennett is also a devoted New York Yankees and New Jersey Devils fan, and thinks plain seltzer is the best drink ever invented.
This article is for general informational purposes only.
Affiliate Disclaimer 
|
Financial Disclaimer
Featured Image Credit:  Donna-Duncan Robertson/ iStock | Updated  Oct 24, 2024 |
Advertisement
Food & Drink 3m read
0

This Thanksgiving Leftovers Hack Is Borderline Genius

Hosting the big holiday feast is a rite of passage that most of us experience sooner or later. Getting everything prepped and on the table can be a real challenge, especially the first time. Then you’re faced with a second challenge: what to do with all those leftovers.

All featured products and deals are selected independently and objectively by the author. House Outlook may receive a share of sales via affiliate links in content.

Hosting the big holiday feast is a rite of passage that most of us experience sooner or later. Getting everything prepped and on the table can be a real challenge, especially the first time. Then you’re faced with a second challenge: what to do with all those leftovers.

Some cooks consider leftovers, and the dishes made from them, to be the best part of Thanksgiving. For others, especially in small households, coping with leftovers feels more like a chore. (“Yes, we’re eating turkey again … ”) Sending home food with your guests is a good way to minimize that task, but it usually means also sending away your food storage containers and hoping to get them back one day. That’s why the viral muffin pan hack for Thanksgiving leftovers is so clever.

What Is the Muffin Pan Hack?

Like many of the best ideas, this one is simple. Instead of giving out your reusable food storage containers, pick up a stack of inexpensive disposable foil muffin or cupcake pans. The individual cups in a standard muffin pan have a capacity of 1/2 cup, which is a good single serving size. For those with bigger appetites or more mouths to feed, jumbo muffin pans hold closer to 1 cup per space.

Related: 7 Fixes for Common Thanksgiving Dinner Problems

Set out your disposable muffin pans at one end of the table, and encourage your guests to each fill a pan to take away. Place a roll of aluminum foil, or better yet, precut lengths of foil, at the other end of the table. Guests can use those to cover and seal the muffin pans so they don’t spill on the way home.

Advertisement

Why the Muffin Pan Hack Is the Gift That Keeps on Thanks-Giving

Sending leftovers away in muffin pans isn’t just convenient — it has a lot of real advantages. First, of course, you get to keep your reusable containers. But the pans also encourage commonsense portion control, allowing leftovers to be split equally among your friends and family.

It’s also better for your guests. Slopping all of the leftovers into a single container often results in an unappetizing mess by the time the food gets home. In a muffin pan, everything stays neat and separate. Finally, a muffin pan provides an easy option for reheating the leftovers. The pan can simply slide right into a low oven or toaster oven, to warm gently until the food reaches the USDA’s recommended food-safe temperature of 165 degrees.

Advertisement
Fred Decker
Writer
Fred Decker is a trained chef and former restaurateur. Since closing his restaurants over a decade ago he has been a prolific freelance writer, publishing several thousand articles on dozens of high-volume websites including Taste Of Home, Hunker, Tasting Table, Week&, eHow, and GOBankingRates. He lives on a rural acreage shared with a big garden, chickens, rabbits, and grandkids.
This article is for general informational purposes only.
Affiliate Disclaimer 
|
Financial Disclaimer
Featured Image Credit:  Lisa J. Goodman/ Moment via Getty Images | Updated  Oct 24, 2024 |
Advertisement
Food & Drink 3m read
0

The Only Hack You Need To Thaw a Turkey Quickly

Getting ready for the holidays takes a bit of organization and preparation. One often-overlooked aspect of Thanksgiving planning is making room in your refrigerator for a frozen turkey to thaw. It takes a long time for your bird to defrost this way, a full 24 hours for every 4 to 5 pounds of turkey weight.

All featured products and deals are selected independently and objectively by the author. House Outlook may receive a share of sales via affiliate links in content.

Getting ready for the holidays takes a bit of organization and preparation. One often-overlooked aspect of Thanksgiving planning is making room in your refrigerator for a frozen turkey to thaw. It takes a long time for your bird to defrost this way, a full 24 hours for every 4 to 5 pounds of turkey weight.

It’s the safest method, and the one the USDA recommends, because your turkey is never exposed to temperatures above 40 degrees Fahrenheit. However, it’s rather inconvenient, because you probably need that refrigerator space for make-ahead dishes and other ingredients for the big feast. Fortunately, there’s a hack that lets you defrost your turkey safely, but in a matter of hours, rather than days. Here’s how it works.

Cold Plunge Your Turkey

The secret is thawing the meat in water. It relies on basic physics, or more specifically, the second law of thermodynamics. If you put a frozen turkey into not-frozen water, thermal energy from the warmer thing (the water) passes into the colder thing (the turkey) and raises its temperature. Water transfers thermal energy more effectively than air does, which is why you can put your hand into an oven at 200 degrees Fahrenheit without harm, but you’ll be scalded badly if you put it into 200-degree water. It’s also why a turkey thaws significantly faster in cold water than in the air of your refrigerator.

Related: 7 Fixes for Common Thanksgiving Dinner Problems

How much faster? As previously mentioned, a turkey thawing in the fridge takes 24 hours for each 4 to 5 pounds. Call it four days for a 16-pound turkey. When you thaw in cold water instead, it takes about 30 minutes per pound or 8 hours total for the same bird. That’s a huge difference, and it’s a game changer if you were late buying your turkey.

Advertisement

How To Safely Thaw a Frozen Turkey in Water

Knowing how to quick-thaw a turkey in water is one thing, but doing it safely (while avoiding food poisoning) is quite another. The key is temperature management: Your fridge is a safe place to thaw your bird because it stays below 40 degrees Fahrenheit, and out of the food safety “danger zone.” To thaw your bird safely in water, you’ll want to ensure the bath stays at 40 degrees or lower.

Do that by adding ice to the water, changing the water every half-hour or so, and monitoring its temperature with an instant-read thermometer. Some thermometers, like this one from GoveeLife, can even sound an alert or send you a push notification when the water temperature starts to rise, so you don’t have to check manually.

Advertisement
Fred Decker
Writer
Fred Decker is a trained chef and former restaurateur. Since closing his restaurants over a decade ago he has been a prolific freelance writer, publishing several thousand articles on dozens of high-volume websites including Taste Of Home, Hunker, Tasting Table, Week&, eHow, and GOBankingRates. He lives on a rural acreage shared with a big garden, chickens, rabbits, and grandkids.
This article is for general informational purposes only.
Affiliate Disclaimer 
|
Financial Disclaimer
Featured Image Credit:  Robin Gentry/ iStock | Updated  Oct 24, 2024 |
Advertisement
Gardening 2m read
0

Bobby Pins Are the Secret to Fuller, Healthier Houseplants

Are you a financially savvy plant parent who prefers to propagate rather than buy new? Is your beloved pothos balding, leaving few leaves in the pot and many more on the vine? If you answered “yes” to either of these questions, this simple hack can help you grow denser, bushier houseplants.

All featured products and deals are selected independently and objectively by the author. House Outlook may receive a share of sales via affiliate links in content.

Are you a financially savvy plant parent who prefers to propagate rather than buy new? Is your beloved pothos balding, leaving few leaves in the pot and many more on the vine? If you answered “yes” to either of these questions, this simple hack can help you grow denser, bushier houseplants.

What Causes Plant Balding?

According to plant shop owner and TikTok creator @TannerThePlanter, the oldest leaves on a vining plant are located closest to the soil. As these leaves naturally die, the plant continues to grow downward, sprouting new leaves. This results in long, bare vines toward the top of the plant, and denser foliage near the bottom.

This phenomenon is commonly seen in varieties of vining houseplants, such as pothos, philodendron, scindapsus, and monstera. Unfortunately, you can’t just apply a few drops of minoxidil to the soil and call it a day. But there’s an inexpensive way to make your houseplant look fuller and encourage future growth.

Advertisement

How To Properly Pin Your Houseplants

The only thing you’ll need for this hack is a handful of bobby pins or plant pins. (These U-shaped bobby pins are particularly useful, but whatever you have on hand will do.) Stretch out the bobby pins so they’re looser and don’t snap back together when you release one end. Identify the nodes along the barren vines — the little knobs where new leaves, stems, and aerial roots eventually grow from the main stem.

Wind one or more vines around the top of the pot, laying them in the soil. Use a few stretched-out bobby pins or plant pins to pin the nodes into the soil. You want to make sure the bobby pins aren’t squeezing the stems too tightly. This hack will instantly make your houseplant appear fuller, and the nodes will eventually root in and produce new leaves.

Advertisement
Kelsey Morrison
Staff Editor
Kelsey Morrison is the Staff Editor of House Outlook. She has been covering all things home-related for over a decade, including real estate, interior design, commerce, and a slew of other lifestyle topics. Kelsey previously worked as a commerce editor for World of Good Brands (eHow.com and Cuteness.com) and as an associate editor for Livabl.com. She describes her personal design style as 1970s ski chalet-chic and has a thing for latch-hook tapestries.
This article is for general informational purposes only.
Affiliate Disclaimer 
|
Financial Disclaimer
Featured Image Credit:  Stephanie Ho/ Pexels | Updated  Oct 25, 2024 |
Advertisement
Food & Drink 9m read
0

7 Fixes for Common Thanksgiving Dinner Problems

Gathering around the holiday table with friends and family is supposed to be a time for enjoyment. In practice, that’s not always the case, though — real-world Thanksgiving dinners can be stressful. If you’re the host, any number of food-related disasters can beset the bird and its side dishes. We can’t do anything about that one relative who always gets on everyone’s nerves, but there are plenty of ways to rescue a holiday dish that’s gone awry. Here are seven of the most common issues, and what you can do about them.

All featured products and deals are selected independently and objectively by the author. House Outlook may receive a share of sales via affiliate links in content.

Gathering around the holiday table with friends and family is supposed to be a time for enjoyment. In practice, that’s not always the case, though — real-world Thanksgiving dinners can be stressful. If you’re the host, any number of food-related disasters can beset the bird and its side dishes. We can’t do anything about that one…

My Turkey Came Out Dry

If your turkey is dry, it usually means the bird has been overcooked. Turkey must reach an internal temperature of 165 degrees Fahrenheit, tested with a thermometer, to be food-safe. Beyond that temperature, though, breast meat dries out quickly. 

Your only fix is to moisten the meat. Gravy is your friend, and a slightly thin one works better than a thick one. If you have extra turkey broth or chicken broth on hand, you can use it to stretch the gravy you’ve already made. Alternatively, you can heat the broth, drizzle it right over the turkey meat, and let it stand for 10 to 15 minutes.

A few simple rules will help avoid a dry turkey in the future:

1. Don’t rely on a pop-up thermometer that came in the bird. They’re usually inaccurate, so use an instant-read or meat thermometer instead.

2. Don’t cook your stuffing in the cavity of the turkey. It needs to reach 165 degrees Fahrenheit to be food-safe, and by the time it gets there, your bird will be overcooked. There are ways to stuff the turkey safely, but it’s easier to make your stuffing in a separate dish.

3. Consider alternative methods. Separating the top half, or crown, from the bottom half of the turkey means you can roast them separately. (Don’t worry, you can still stack them back together if you like to carve at the table.) As a chef, I’m a big fan of spatchcocking, or butterflying, my bird. When flattened, the turkey cooks more quickly, stays juicy, and the skin becomes beautifully crisp.

4. Brine your turkey. Brining helps the meat stay moist, even if it spends too long in the oven.

Credit: Candice Bell/ Shutterstock

My Mashed Potatoes Are Watery

Mashed potatoes may come out watery if you’ve cooked them for too long, or left the spuds in the water too long before draining. Russets are especially prone to this problem. Here are a few easy fixes for runny mashed potatoes: 

1. Leave the pot of mashed potatoes on a low burner, stirring frequently to evaporate excess moisture. This works best when the potatoes are only a bit watery; otherwise, it takes too long.

2. Cook another potato and mash it into the watery ones. The fastest way to do this is in the microwave, where it can cook in 3 to 6 minutes (way quicker than boiling more water).

3. Add some instant mashed potato flakes. It’s a good idea to keep a box of these on hand over the holidays anyway, in case you need extra mashed potatoes in a hurry. If you stir a half-cup or so into your watery potatoes and let them sit for a few minutes, they’ll stiffen right up.

The same fixes also work if you’ve been overenthusiastic about adding milk or cream to your spuds. On the other hand, if you find that your potatoes are now dry or too stiff, you can carefully add a splash or two of warm milk, cream, or melted butter to moisten and enrich them.

Credit: Candice Bell/ Shutterstock
Advertisement

My Mashed Potatoes Are Gummy

Potatoes get gummy when you mash them too enthusiastically — especially if you use a stand mixer or food processor to do the work. This happens because too many of the potatoes’ starch cells get broken up, releasing that gummy starch into your mash.

There are a few remedies you can try:

1. Stir melted butter into the gummy potatoes. It lubricates the starch molecules and helps keep them from glomming together in a sticky mouthful.

2. If you have time, mix the failed mashed potatoes with a creamier batch. Cook more potatoes, and mash them (gently!) with some hot milk or cream and melted butter. Then fold in the gummy potatoes, a scoop or two at a time, until there’s enough for your guests or the gumminess starts to become detectable again. Combining this with the first tip and adding more butter also helps.

3. Use instant mashed potatoes in the same way, especially if you don’t have enough time or extra spuds to cook more from scratch.

4. Turn the gummy potatoes into a casserole. Stir in extra butter (and optionally, cheese) and top them with breadcrumbs for a textural contrast that will mask the potatoes’ gumminess. Give the dish 10 to 15 minutes in a hot oven to brown up before serving.

Related: An Easy Trick To Revive Carrots That Have Gone Limp

Of course, if you have enough potatoes and can manage the time, your best alternative is to make a whole new batch. You can use the gummy potatoes for a different meal (potato soup, perhaps). 

Credit: Elena Shashkina/ Shutterstock

My Gravy Is Lumpy

Gravy enhances many dishes in a holiday meal, so it’s frustrating when it doesn’t come out as well as you’d like. Lumps are a minor irritation and easy to fix, but ideally, something you’d like to avoid.

Once the gravy is made, there are two relatively quick fixes:

1. Pour the gravy through a wire mesh strainer to catch the lumps.

2. Blitz the gravy with an immersion blender to break up the lumps.

As for why it happens, that depends on how you make your gravy. If you first make a roux with flour and either butter or fat from the turkey, you’ve probably stirred in the broth too quickly. Take it slowly, and whisk often as you pour. It also helps if you set aside some cold broth and use that first, only adding hot broth once the roux is well hydrated.

If you make your gravy by stirring cornstarch or flour into cold water to form a slurry, lumps usually come from pouring too quickly and not whisking enough. You may also get lumps in your slurry if you haven’t whisked the ingredients thoroughly, and those survive in the finished gravy.

Credit: ahirao_photo/ iStock
Advertisement

My Stuffing Is Soggy

Most forms of stuffing call for a dry, starchy ingredient (usually bread, sometimes cornbread) mixed with aromatic flavorings and some broth. If your stuffing comes out soggy, it typically means you used too much broth or didn’t uncover the pan soon enough so it could crisp and lose moisture to evaporation. 

This situation is a tough one to fix. If you happen to have a box of instant stuffing in your pantry, you can stir the dried bread from that into your soggy stuffing. Then, microwave it, or return it to the oven if time permits, and the dried bread should absorb enough moisture to fix the stuffing. You could also heat it in the microwave or regular oven, stirring frequently, to allow excess moisture to evaporate. Instant mashed potato flakes can help here, too. They will change the consistency and flavor of your stuffing, but only slightly.

Credit: Imagesbybarbara/ iStock

The Skin on My Turkey Is Flabby and Pale

You’ll find that this is a common problem if you use a lower-temperature cooking method or a breast-down placement at the beginning of the cooking time. Basting can also be the culprit if the juices you’re basting with have too much liquid and not enough fat. 

Related: 9 Nutritious Nonperishable Foods To Stock for Emergencies

If you notice this problem developing before the turkey is cooked through, place a wire cooling rack on a sheet pan (line it first with parchment or foil to catch the drips). Then, transfer the bird from its roasting pan to the sheet pan, and crank your oven to 450 degrees Fahrenheit. Ten to 20 minutes at this temperature will usually salvage the turkey, resulting in a crisp, golden skin. A few minutes under the broiler will also work, but you’ll need to wrestle the bird onto its sides for even browning and run the risk of some parts of the skin burning.

Credit: Алексей Кравчук/ iStock

My Pie Crust Is Soggy

This usually happens if you haven’t started your pie at high heat, so the crust can set and begin to firm up immediately. Another common cause is pouring a still-warm custard filling into the shell without cooling it first. 

This one’s tough because once the pie is baked, there’s little you can do to remedy it without spoiling its appearance. On the upside, if you delegate others to clear the table and serve coffee, you’ll have time to mount a rescue operation. A few options include:

1. If you have store-bought pie shells or individual tart shells on hand, transfer the filling of your pie into them. Smooth the top as best you can, and then pipe rosettes of whipped cream or meringue over the top to conceal its messy surface.

2. Bake a hasty batch of graham-crumb crust on a sheet pan while you serve the main course. When it’s set, after 10 to 15 minutes, break it into pieces. Layer the baked crust, the filling from the ill-fated pie, and whipped cream or instant pudding to make a parfait-style, “deconstructed” dessert. 

3. Spread the pie filling between cookies to make Thanksgiving sandwiches — dessert-style, that is. Gingersnaps go well with pumpkin or pecan pie, but shortbread or sugar cookies also work.

Credit: Shutterstock

It’s never a bad idea to have a Plan B in the back of your mind, just in case something goes wrong with a key part of the meal. Stocking up on extra broth, instant mashed potatoes, prebaked pie shells, and — in a worst-case scenario — store-bought desserts, can give you peace of mind.

Advertisement
Fred Decker
Writer
Fred Decker is a trained chef and former restaurateur. Since closing his restaurants over a decade ago he has been a prolific freelance writer, publishing several thousand articles on dozens of high-volume websites including Taste Of Home, Hunker, Tasting Table, Week&, eHow, and GOBankingRates. He lives on a rural acreage shared with a big garden, chickens, rabbits, and grandkids.
This article is for general informational purposes only.
Affiliate Disclaimer 
|
Financial Disclaimer
Featured Image Credit:  Karolina Grabowska/ Unsplash+ | Updated  Oct 24, 2024 |
Advertisement
Food & Drink 3m read
0

3 Proven Hacks for Cutting Onions Without Crying

There are two universal truths about onions: They add depth of flavor to a variety of dishes, and they make you cry when you cut them. Both have the same root cause — volatile sulfur compounds. These organic molecules provide the pungent flavor we love, and also the tears we could do without.

All featured products and deals are selected independently and objectively by the author. House Outlook may receive a share of sales via affiliate links in content.

There are two universal truths about onions: They add depth of flavor to a variety of dishes, and they make you cry when you cut them. Both have the same root cause — volatile sulfur compounds. These organic molecules provide the pungent flavor we love, and also the tears we could do without.

Chemists have identified the chemical compound in question, a lachrymatory factor called syn-propanethial-S-oxide. That’s Ph.D.-speak for “a substance that makes you cry.” If you’d rather avoid the runny mascara and nose-blowing, however, here are three proven ways to cut onions without shedding any tears.

Use a Really Sharp Knife

Onions aren’t a tear gas bomb when they’re intact. It’s only when they’re chopped that an enzyme, normally trapped inside the cell walls, interacts with one of those sulfur compounds to make the infamous lachrymatory factor. The more cells are crushed or damaged, the more this enzyme is released, and the more you’ll cry.

So, how do you cut an onion with minimal cellular damage? Use a really sharp knife. A sharp blade shears the cell walls neatly, with minimal damage. A dull one crushes them. That makes a significant difference.

Advertisement

Chill the Onion Before You Cut It

This trick makes the rounds on social media on a regular basis. And unlike many other common onion-cutting hacks, this one actually works. Low temperatures reduce enzyme activity and sulfur volatility, but chilling your onions enough to make a difference takes about 30 minutes in the freezer. Alternatively, store a few onions in your fridge so they’re thoroughly chilled whenever you need to cut them. If the onion isn’t cold all the way through, the hack won’t work.

Cut Onions in Front of a Fan

This onion-cutting hack is also effective, though finding space can be problematic in small kitchens. The onion chemicals won’t irritate your eyes if they never reach them, so put a small fan beside your cutting board. (We like the Fanion, which is adorably onion-shaped and compact enough to sit on your cutting board, but any desk fan will do.)

Related: A Simple Trick for Getting the Garlic Smell Off Your Hands

As you cut the onion, it releases its chemicals in the form of tiny droplets. The fan simply blows them away from you, rather than letting them rise naturally. If you have a powerful vent hood, slicing onions next to the stove with the vent hood running can also help. It’s not as effective as a fan blowing directly across your cutting board, though.

Bonus Hack: Wear Eye Protection

Physically blocking the “onion juice” from your eyes is the ultimate answer. Jobsite-style protective eyewear helps, but swimming or laboratory goggles are better. You may feel foolish, but at least you won’t cry.

Advertisement
Fred Decker
Writer
Fred Decker is a trained chef and former restaurateur. Since closing his restaurants over a decade ago he has been a prolific freelance writer, publishing several thousand articles on dozens of high-volume websites including Taste Of Home, Hunker, Tasting Table, Week&, eHow, and GOBankingRates. He lives on a rural acreage shared with a big garden, chickens, rabbits, and grandkids.
This article is for general informational purposes only.
Affiliate Disclaimer 
|
Financial Disclaimer
Featured Image Credit:  Credit: siamionau pavel/ Shutterstock | Updated  Oct 24, 2024 |
Advertisement
Cleaning 4m read
0

The One Thing You Should Do To Make Your Refrigerator Run More Efficiently

Was your last electricity bill much higher than usual? Does your beer not feel as cold as it once did? Are you kept awake at night by the sound of your fridge sputtering and rattling? If you relate to any of these scenarios, it could be a sign that your refrigerator isn’t running as efficiently as it should be. Like any other home appliance, fridges occasionally require maintenance, but scheduling an appointment with a professional is often expensive and inconvenient. So before you do that, here’s one thing you can — and should — do to make a refrigerator run more efficiently.

All featured products and deals are selected independently and objectively by the author. House Outlook may receive a share of sales via affiliate links in content.

Was your last electricity bill much higher than usual? Does your beer not feel as cold as it once did? Are you kept awake at night by the sound of your fridge sputtering and rattling? If you relate to any of these scenarios, it could be a sign that your refrigerator isn’t running as efficiently…

Clean the Condenser Coils

Condenser coils are an integral component of any refrigerator, as they help keep the entire appliance cool by releasing any absorbed heat. The coils are usually located underneath or on the back of the fridge and may be hidden behind a panel. (A quick Google search including your refrigerator’s make and model should help you locate them.) Over time, the coils become clogged with dust, pet hair, and other household dirt, forcing the fridge to work harder for lesser results. This leads to higher energy bills, a shorter lifespan for the machine, and a failure to cool your food properly. But keeping the coils clean can improve a refrigerator’s energy efficiency by up to 30%, saving you cash on your monthly bills and extending the life of the appliance.

How To Clean the Coils

Cleaning condenser coils is a relatively simple process but requires a little bit of care to avoid serious injury. Here’s how you should go about it:

Step 1: Unplug the refrigerator before doing anything else. Leaving the fridge plugged in may result in electrical damage or even an unexpected shock or two.

A Note on Food Safety

If you’re going to leave the refrigerator unplugged for more than four hours (perhaps you’re using this opportunity to defrost your freezer), transfer all of your perishables to another fridge or cooler first. This should keep the food at a safe temperature until the out-of-commission fridge is running again. Be sure to remove any glass jars before moving the fridge. If you don’t, they could tip over and shatter inside, creating an even bigger mess than the dusty condenser coils.

Advertisement

Step 2: Carefully move the refrigerator out far enough so you can easily reach behind it. If it’s too heavy, don’t try to be a hero; ask a friend or family member for assistance.

Step 3: Find the coils, and, if necessary, carefully remove the panel if one is obstructing them. Set that panel aside until the job is complete. Note: If you have the misfortune of owning a refrigerator with condenser coils on the bottom, this YouTube video shows you how to clean them using compressed air, a box fan, and a filter.

Related: 5 Essential Tips for Cleaning Smarter, Not Harder

Step 4: Take an elongated, flexible cleaning brush — we recommend this one from Amazon — and run it over the coils to remove any dust or hair. Be gentle, as you’ll want to avoid bending or damaging the coils. While your vacuum cleaner’s soft brush attachment can be used in this situation, we find the condenser coil brush to be more effective. That said, cleaning coils tends to result in a plethora of dust bunnies, so take a few minutes to vacuum or sweep the area afterward.

Step 5: Replace the panel if need be, and carefully return the fridge to its original spot. Then plug it back in and the appliance should work like new.

Advertisement
Bennett Kleinman
Staff Writer
Bennett Kleinman is a New York City-based staff writer for Optimism Media, covering topics for several brands including House Outlook and Better Report. He previously contributed to television programs such as "Late Show With David Letterman" and "Impractical Jokers," and digital publications like The Onion. Bennett is also a devoted New York Yankees and New Jersey Devils fan, and thinks plain seltzer is the best drink ever invented.
This article is for general informational purposes only.
Affiliate Disclaimer 
|
Financial Disclaimer
Featured Image Credit:  Andrey_Popov/ Shutterstock | Updated  Oct 22, 2024 |
Advertisement
Home Improvement 3m read
0

5 Unexpected Ways To Use Cooking Spray Around the House

Don’t let the name fool you — cooking spray isn’t just for greasing up frying pans to prevent eggs from sticking. This pantry staple has a wide range of uses, both in and out of the kitchen, all of which can make everyday tasks a whole lot easier. So, grab a can of nonstick cooking spray — whether it’s vegetable, canola, olive, or avocado oil-based — and get ready to use it in these five unexpected ways.

All featured products and deals are selected independently and objectively by the author. House Outlook may receive a share of sales via affiliate links in content.

Don’t let the name fool you — cooking spray isn’t just for greasing up frying pans to prevent eggs from sticking. This pantry staple has a wide range of uses, both in and out of the kitchen, all of which can make everyday tasks a whole lot easier. So, grab a can of nonstick cooking…

Prevent Stains From Forming

Saucy pastas and greasy stews often leave behind unsightly stains on plastic food storage containers. To prevent discoloration from happening in the first place, coat the inside of the storage container with a light layer of nonstick cooking spray, and then add your food. Once the leftovers have been finished and it’s time to wash the dishes, you’ll see that your plastic container looks as clear as the day you bought it.

Remove Shower and Soap Scum

Soap scum is a mixture of soap and hard water that leaves a white, powdery residue on shower doors, tile, and faucets. Cleaning it usually requires a scrubbing brush and considerable elbow grease, but the natural oils in cooking spray can help break down those pesky lime deposits, making them easeri to remove. Just spray the soap scum with some cooking oil and let it sit for five to 10 minutes. Rinse the surface with water and dry it with a clean rag for a scum-free finish.

Advertisement

Shine Your Faucets

Once you’re done getting rid of all that bathroom grime, it’s time to restore some shine to your dingy-looking fixtures. Spray the sink faucet, shower head, bathtub spout, or any other metallic surface with cooking spray. Then, using a clean rag, spread the oils around in a circular motion to buff out any smudges. Before too long, your metal bathroom fixtures will be absolutely glistening.

Quiet Squeaky Door Hinges

Much like WD-40, cooking spray can be used to quiet creaky door or cabinet hinges. Spray a bit of cooking oil onto the hinge itself — just be careful to avoid getting any on the door, as the oils could damage the wood or paint. This should lube up the hinge enough to get rid of those deafening creaks.

Related: Remove Water Stains From Wood Furniture With This One Ingredient

Spray Your Measuring Cups

If you’re making a recipe that requires measuring out honey, maple syrup, or any other sticky ingredient, cooking spray is your new best friend. Coat the measuring cup with a fine layer of cooking oil before adding in your peanut butter, molasses, or corn syrup. When it’s time to pour that goop into a bowl, the contents should slide out easily thanks to the cooking spray, leaving behind little to no sticky residue.

Advertisement
Bennett Kleinman
Staff Writer
Bennett Kleinman is a New York City-based staff writer for Optimism Media, covering topics for several brands including House Outlook and Better Report. He previously contributed to television programs such as "Late Show With David Letterman" and "Impractical Jokers," and digital publications like The Onion. Bennett is also a devoted New York Yankees and New Jersey Devils fan, and thinks plain seltzer is the best drink ever invented.
This article is for general informational purposes only.
Affiliate Disclaimer 
|
Financial Disclaimer
Featured Image Credit:  Credit: NDanko/ Shutterstock | Updated  Oct 22, 2024 |