Advertisement
Gardening 3m read
0

This Trick Makes Bagging Fallen Leaves So Much Easier

When you’re done making leaf angels and it’s time to bag up the fallen leaves, you might find yourself in a bit of a pickle: How do you keep the garbage bag upright and open if your hands are already preoccupied gathering armfuls of leaves? It’s not always possible to enlist the help of a friendly neighbor, and using your feet to keep the bag open while raking isn’t that easy either. Thankfully, there’s a trick to make bagging fallen leaves much simpler, and it calls for a standard cardboard box — something you likely have in your recycling bin.

All featured products and deals are selected independently and objectively by the author. House Outlook may receive a share of sales via affiliate links in content.

When you’re done making leaf angels and it’s time to bag up the fallen leaves, you might find yourself in a bit of a pickle: How do you keep the garbage bag upright and open if your hands are already preoccupied gathering armfuls of leaves? It’s not always possible to enlist the help of a…

What You’ll Need

Trash bags designed for lawn and leaf care

Large, flattened cardboard box

Garden rake or broom

Leaf scoops (not necessary, but nice to have)

Bagging Leaves, Made Easy

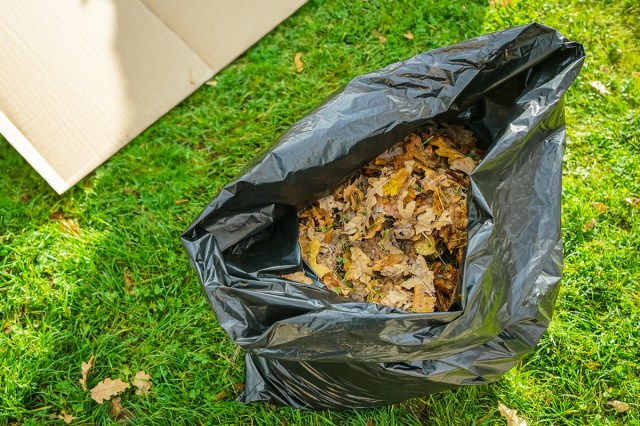
Begin by taking a large, flattened cardboard box and folding it into a U-shape, creating one flat panel on the bottom and two side panels that are angled up. This type of fold is referred to as a gatefold, and is often used for brochures and menus. Open a garbage bag and partially insert the gatefolded cardboard into the bag, placing the entire thing on the ground. This creates an open-topped funnel that keeps the garbage bag wide open while you’re raking.

Related: 7 Vegetables To Plant This Fall for Early Spring Produce

At this point you can proceed in one of two ways: Either leave the box and bag lying flat on the ground, using a rake or broom to direct the leaves, or tilt the box upward toward the sky, gather leaves by the handful, and drop them in from above. Once done, remove the box, compress the leaves using the rake or your hands, and tie the bag shut.

Advertisement

What’s Next?

Now that you have a clean lawn and bags full of leaves, what should you do with them? If your community provides curbside pickup, that’s one way to go. But you can also use those leaves to create nutrient-rich compost to stimulate garden growth come spring. Just keep in mind that you should use leaves from maple, birch, ash, and cherry trees, as oak leaves are too acidic.

Take a bag of leaves to a corner of your yard and pour them into a pile. (We know you just raked them up, but trust the process.) Then use a lawn mower or leaf shredder to shred the leaves, before adding in any grass clippings or vegetable scraps. Once or twice a week, use a shovel to turn the compost, which introduces oxygen and allows the microorganisms to breathe. If you start this process in the autumn, you’ll have a healthy compost pile by springtime that you can use to promote plant growth in your garden.

Advertisement

Bennett Kleinman
Staff Writer
Bennett Kleinman is a New York City-based staff writer for Optimism Media, covering topics for several brands including House Outlook and Better Report. He previously contributed to television programs such as "Late Show With David Letterman" and "Impractical Jokers," and digital publications like The Onion. Bennett is also a devoted New York Yankees and New Jersey Devils fan, and thinks plain seltzer is the best drink ever invented.
This article is for general informational purposes only.
Affiliate Disclaimer 
|
Financial Disclaimer
Featured Image Credit:  maradon 333/ Shutterstock | Updated  Oct 22, 2024 |
Advertisement
Cleaning 3m read
0

This Paper Towel Hack Can Save You Money and Reduce Waste

Like most items on our grocery bills, the price of paper towels continues to rise. You can cut costs by buying them in bulk, but even then we’re talking upwards of $40 for a 12-pack. At the rate most people go through paper towels, it can really add up.

All featured products and deals are selected independently and objectively by the author. House Outlook may receive a share of sales via affiliate links in content.

Like most items on our grocery bills, the price of paper towels continues to rise. You can cut costs by buying them in bulk, but even then we’re talking upwards of $40 for a 12-pack. At the rate most people go through paper towels, it can really add up.

Rags and reusable “paper” towels are a more environmentally friendly alternative, but regular paper towels still come in handy for certain things. When there’s a big spill, using full-size paper towels — likely more than one or two — can mop it up quickly. But when there’s a small spill or you want to use a paper towel as a napkin, even tearable paper towels can feel too big and wasteful.

If you’re a paper towel household and constantly find yourself either ripping paper towels in half to waste less or using a whole one when all you really need is a small portion, this money-saving paper towel hack is for you.

The hack, originally introduced by Instagrammer and hack expert LORAfied, consists of using a sharp knife to cut a roll of paper towels in half. With less surface area, the goal is to waste fewer paper towels. It’s a simple solution that can help your paper towels go twice as far.

Advertisement

Here’s How It’s Done

Grab a long, sharp knife and place a roll of paper towels horizontally on a cutting board. Carefully cut the roll in half down the middle. The halves might fray and shred a bit, so if that happens, you might want to try a different knife. But even with a little fraying, the hack will still be successful.

Related: 5 Unexpected Ways To Clean With Denture Tablets

Once the paper towel roll is cut in half, place the two halves on your paper towel holder. If you have an upright, freestanding paper towel holder, stack the two halves on top of each other. A horizontal paper towel holder will work the same way, but the halves will sit next to each other.

Then, the next time you need a napkin or want to wipe up a small spill, grab a half-size paper towel. You’ll save money and waste less — a win-win.

Advertisement
Jill Layton
Writer
Jill Layton started writing professionally when she realized her emails and texts were kinda funny. She’s an affiliate shopping writer and lifestyle contributor for Scary Mommy, Bustle, Mic, and Best Products. She’s the mom of two alarmingly witty kids and the world’s most perfect dog.
This article is for general informational purposes only.
Affiliate Disclaimer 
|
Financial Disclaimer
Featured Image Credit:  Shutterstock | Updated  Jan 9, 2025 |
Advertisement
Food & Drink 3m read
0

An Easy Trick To Revive Carrots That Have Gone Limp

When you buy a bag of whole carrots, it’s fair to assume that a few of them will end up going limp after a couple of weeks. Unless you’re a diligent meal planner, it can be difficult to use up an entire pound of carrots in a short amount of time. But just because a carrot has turned bendy and soft doesn’t mean it can’t be revived.

When you buy a bag of whole carrots, it’s fair to assume that a few of them will end up going limp after a couple of weeks. Unless you’re a diligent meal planner, it can be difficult to use up an entire pound of carrots in a short amount of time. But just because a carrot…

A game-changing hack can turn floppy carrots into crunchy, delicious root vegetables once again. The trick is to chop the carrots into matchsticks (also called a julienne cut) and place them in an airtight jar of cold water. (Something like a Mason jar or a canister with a clamp lid would work great.) Make sure the carrots are completely submerged and refrigerate them overnight.

If you’re short on time, adding ice to the water can help speed up the process — even just five minutes in an icy bath can make a big difference. The carrots will regain their crunch and stay that way for weeks when stored this way.

Advertisement

The Science Behind Reviving Wilted Vegetables

Carrots are root vegetables that contain 85% to 95% water, according to Healthline. When a carrot is immersed in fresh water, it absorbs the water through osmosis. Remember osmosis from your elementary school science class? It’s the process of water moving into an organism, like a carrot, because the carrot is saltier than the surrounding water. This causes the carrot to stiffen. If you have kids or grandkids, this could be a fun science experiment for them to participate in.

Related: How To Slice Grapes and Cherry Tomatoes in Seconds Flat

Unfortunately, you won’t be able to rehydrate moldy carrots or ones that have gone bad, but fresh-looking bendy carrots are fair game. The same hack can be applied to many other vegetables, including lettuce, celery, broccoli, beets, asparagus, potatoes, and herbs.

So, the next time you find a rogue limp carrot in the bottom of your crisper drawer, try this hack and get yourself some hummus or ranch for a nutritious and crunchy snack.

Advertisement
Jill Layton
Writer
Jill Layton started writing professionally when she realized her emails and texts were kinda funny. She’s an affiliate shopping writer and lifestyle contributor for Scary Mommy, Bustle, Mic, and Best Products. She’s the mom of two alarmingly witty kids and the world’s most perfect dog.
This article is for general informational purposes only.
Affiliate Disclaimer 
|
Financial Disclaimer
Featured Image Credit:  jreika/ Shutterstock | Updated  Apr 9, 2025 |
Advertisement
Organizing 2m read
0

This Hack for Labeling Moving Boxes Is a Total Game Changer

Moving an entire household is stressful, to say the least. But properly labeled boxes can help you avoid moving-day chaos and make it easier for you, your professional movers, or your extremely generous friends to identify where to put your things in your new place.

All featured products and deals are selected independently and objectively by the author. House Outlook may receive a share of sales via affiliate links in content.

Moving an entire household is stressful, to say the least. But properly labeled boxes can help you avoid moving-day chaos and make it easier for you, your professional movers, or your extremely generous friends to identify where to put your things in your new place.

Since boxes look practically identical once they’re on the moving truck, they have to be labeled. Otherwise, you’ll end up with bathroom stuff in your kitchen (and vice versa), and waste time re-relocating your belongings from room to room. To save yourself the trouble of writing on each and every box, though, and to quickly and efficiently designate which box goes where, consider this handy moving box labeling hack.

The key is to develop a color-coding system. To get it done, you’ll need several rolls of masking tape in different colors — specifically, a different color for each room. You’ll also need a flattened cardboard box or a large piece of paper.

Advertisement
Color-Coding Steps

1. Assign each room at your new residence a different color of masking tape. Place a strip of the assigned tape on the wall just outside the room (or inside if that makes more sense for an open-concept space like a living room or kitchen).

2. Create a cheat sheet to keep track of all the colors/rooms and place it in a central location or outside the main entrance. This can be done on a flattened moving box.

3. As you pack up the goods for a particular room, place strips of the corresponding tape on the top and all four sides of the box so it’s immediately clear where it belongs.

4. If your new home has more than one level, you can put multiple tape colors at each end of the staircase to signal which rooms are located upstairs or downstairs.

This time-saving hack will make unpacking a whole lot easier — and your movers are guaranteed to be impressed.

Advertisement
Jill Layton
Writer
Jill Layton started writing professionally when she realized her emails and texts were kinda funny. She’s an affiliate shopping writer and lifestyle contributor for Scary Mommy, Bustle, Mic, and Best Products. She’s the mom of two alarmingly witty kids and the world’s most perfect dog.
This article is for general informational purposes only.
Affiliate Disclaimer 
|
Financial Disclaimer
Featured Image Credit:  Studio CJ/ iStock | Updated  Oct 18, 2024 |
Advertisement
Food & Drink 3m read
0

This Chef-Approved Trick Keeps Herbs Fresher for Longer

Fresh herbs can completely transform the flavor of a dish. A few basil leaves or a sprig of thyme can elevate a microwave meal into a five-star feast. But as delicious as fresh herbs may be, they can wilt and go bad in the blink of an eye. That being said, there are ways to keep herbs fresher for longer. Here’s one such chef-approved trick to extend the life of your herbs.

Fresh herbs can completely transform the flavor of a dish. A few basil leaves or a sprig of thyme can elevate a microwave meal into a five-star feast. But as delicious as fresh herbs may be, they can wilt and go bad in the blink of an eye. That being said, there are ways to…

Use a Damp Paper Towel for Hardy Herbs

Hardy herbs such as oregano, rosemary, and thyme can survive for two to three weeks with this trick. Run a paper towel under water until damp, then wrap it around the entire herb. Place it inside an airtight vessel, such as a Ziploc bag or food storage container. This is an important step to follow as it prevents oxygen from coming into contact with the herbs, which causes them to brown. Put the container inside the fridge, and be sure to check the paper towel from time to time. If it begins to dry out, replace the towel with a newly dampened one.

Related: A Simple Trick for Getting the Garlic Smell Off Your Hands

Use the Bouquet Method for Soft Herbs

While the aforementioned method is ideal for extending the life of hardy herbs, the rules are different for soft herbs such as cilantro, mint, and parsley. First, wash and dry the herbs, patting them down with a paper towel to remove excess moisture. Next, trim the bottom half inch of each stem and place the herbs in a tall glass with about an inch of water, like they’re a bouquet of flowers. Finally, cover the entire “bouquet” of herbs with a plastic bag (a produce bag from the grocery store will do), and then put it inside the refrigerator. This should keep those soft herbs fresh for several weeks longer.

Advertisement

Basil Lovers Take Note

While most herbs — both hardy and soft — can and should be stored in the refrigerator, there’s one major exception: basil. Basil is an herb that many chefs rely on, but refrigerating it will cause the leaves to wilt and turn brown extremely quickly. Here’s what you should do instead: Prepare the basil using the bouquet method above. Then, instead of putting the basil in the fridge, just leave it on the countertop at room temperature, preferably in an area without direct sunlight. This is the best way to prolong the life of your basil, allowing you to garnish pizza margherita and pad thai to your heart’s content.

Advertisement
Bennett Kleinman
Staff Writer
Bennett Kleinman is a New York City-based staff writer for Optimism Media, covering topics for several brands including House Outlook and Better Report. He previously contributed to television programs such as "Late Show With David Letterman" and "Impractical Jokers," and digital publications like The Onion. Bennett is also a devoted New York Yankees and New Jersey Devils fan, and thinks plain seltzer is the best drink ever invented.
This article is for general informational purposes only.
Affiliate Disclaimer 
|
Financial Disclaimer
Featured Image Credit:  Arina P Habich/ Shutterstock | Updated  Oct 8, 2024 |
Advertisement
Home Improvement 3m read
0

Defrost Your Windshield in Seconds With This Life-Changing Hack

It’s the dead of winter and you’re already running late for an appointment. Suddenly, another hurdle presents itself: Your car’s windshield is covered in ice. Anyone who lives in a place with freezing weather knows just how annoying it is to deal with icy windshields. Cranking up the heat and letting it run is one option, but that takes valuable time you may not have. Don’t worry, though — there’s a quick and easy hack to defrost your windshield in seconds, no scraping required.

It’s the dead of winter and you’re already running late for an appointment. Suddenly, another hurdle presents itself: Your car’s windshield is covered in ice. Anyone who lives in a place with freezing weather knows just how annoying it is to deal with icy windshields. Cranking up the heat and letting it run is one…

The Solution

Though this hack certainly feels magical, it’s actually just simple science. Take a plastic Ziploc bag and fill it with warm water. (The more leakproof the bag, the better.) Then go out to your car and softly wipe the water-filled bag against the windshield. The warmth from the bag should melt the frost quickly, and you’ll be ready to drive in no time. Even better, the bag should keep your hands warm and toasty. Once the frost is gone, use a squeegee or the windshield wipers to get rid of any leftover moisture.

What Not To Do

We can’t stress this enough: Never pour hot water directly onto the windshield itself, as doing so may crack the windshield. Always err on the side of caution and apply indirect heat instead.

Advertisement

Other Helpful Tips

Bags full of warm water aren’t the only defrosting hack. Salt is yet another handy tool for defrosting windows, as it has a lower freezing point than water and can quickly dissolve ice. We suggest grabbing a spray bottle and filling it with a mix of warm water and one cup of table salt or a quarter-cup of ice melt. Then use the bottle to spray down the windshield to remove the frost. Avoid spraying any of the car’s metal components, as the salt may corrode them.

Related: Helpful Hacks To Lower Your Heating Costs During the Colder Months

You can also take preventative measures to keep frost from forming at all. When the forecast calls for snow, spread a large piece of cardboard or a spare towel over the windshield. When the storm passes, simply remove the cardboard or towel and your windshield should be ice-free.

Advertisement
Bennett Kleinman
Staff Writer
Bennett Kleinman is a New York City-based staff writer for Optimism Media, covering topics for several brands including House Outlook and Better Report. He previously contributed to television programs such as "Late Show With David Letterman" and "Impractical Jokers," and digital publications like The Onion. Bennett is also a devoted New York Yankees and New Jersey Devils fan, and thinks plain seltzer is the best drink ever invented.
This article is for general informational purposes only.
Affiliate Disclaimer 
|
Financial Disclaimer
Featured Image Credit:  Radowitz/ Shutterstock | Updated  Oct 4, 2024 |
Advertisement
Cleaning 3m read
0

5 Unexpected Ways To Clean With Denture Tablets

Using dissolvable tablets to keep dentures clean feels like a video game cheat code, as they kill bacteria and eliminate odors more effectively than anything else. But why limit yourself to cleaning just dentures? These tiny godsends can treat pesky stains all around the house, especially in the bathroom and kitchen. Here are five ways you might never have thought to use them.

All featured products and deals are selected independently and objectively by the author. House Outlook may receive a share of sales via affiliate links in content.

Using dissolvable tablets to keep dentures clean feels like a video game cheat code, as they kill bacteria and eliminate odors more effectively than anything else. But why limit yourself to cleaning just dentures? These tiny godsends can treat pesky stains all around the house, especially in the bathroom and kitchen. Here are five ways…

The Best Denture Tablets for Household Cleaning

Efferdent

Polident

Dental Duty

To Remove Toilet Bowl Stains

It’s tough to prevent hard water stains from forming inside the toilet bowl. But it’s easy to get rid of them using denture tablets. Take five or six tablets and let them dissolve in the toilet water overnight. After a good night’s sleep, scrub down the toilet with a toilet brush. The stains should be as good as gone, but if they aren’t, just try again the following night and they’ll vanish in no time.

Advertisement

To Treat Coffeepot and Teapot Stains

Coffee and tea stains are seemingly impossible to clean, but not with denture tablets. Fill your coffeepot or teapot with warm water and let a denture tablet dissolve for several hours before wiping away the stains with a soapy sponge. If you have a drip coffee maker, you can achieve an extra-deep clean by putting two tablets in the water reserve and running a regular brew cycle.

Related: This Genius Laundry Hack Can Significantly Reduce Drying Time

To Eliminate Travel Mug and Water Bottle Odors

Some travel mugs and water bottles are far too narrow to reach into and clean with a sponge or even a brush. If this is the case, fill the mug or bottle with water and let a denture tablet dissolve overnight. The next morning, wash out the remnants with warm, soapy water, and you won’t have to worry about hard water buildup or unpleasant odors any longer.

Advertisement

To Clean Food Container Discoloration

Spaghetti, curry dishes, and other saucy foods can leave unsightly stains on food storage containers. To remove the discoloration, fill the container with warm water and add a denture tablet. After a few hours have passed, simply wipe away those stains with warm water and soap.

To Unclog Showerheads and Faucets

Hard water buildup can clog showerheads and faucets, restricting water flow and pressure. Thankfully, there’s a solution: Take a plastic sandwich bag (or freezer bag, depending on the size of your fixture) and fill it with warm water and a denture tablet. Then secure the bag around the spout using a rubber band. The effervescence will help break down the mineral deposits in just a few hours, after which you can remove the bag and brush away the remnants.

Advertisement
Bennett Kleinman
Staff Writer
Bennett Kleinman is a New York City-based staff writer for Optimism Media, covering topics for several brands including House Outlook and Better Report. He previously contributed to television programs such as "Late Show With David Letterman" and "Impractical Jokers," and digital publications like The Onion. Bennett is also a devoted New York Yankees and New Jersey Devils fan, and thinks plain seltzer is the best drink ever invented.
This article is for general informational purposes only.
Affiliate Disclaimer 
|
Financial Disclaimer
Featured Image Credit:  Credit: Yanwei Jiang/ iStock | Updated  Sep 25, 2024 |
Advertisement
Decorating 3m read
0

Follow This One Designer Tip When Shopping for Lightbulbs

There’s a reason no one looks good in a hospital, no matter how healthy they are. The same can be said of certain offices and dressing rooms. How you look (and oftentimes feel) in a space comes down to one small but significant aspect: lighting.

All featured products and deals are selected independently and objectively by the author. House Outlook may receive a share of sales via affiliate links in content.

There’s a reason no one looks good in a hospital, no matter how healthy they are. The same can be said of certain offices and dressing rooms. How you look (and oftentimes feel) in a space comes down to one small but significant aspect: lighting.

Even the most beautifully designed space can feel uncomfortable when outfitted with the wrong lightbulbs, whether they’re too bright, too dull, or too cool. There’s a Goldilocks balance to shopping for lightbulbs — you want to get it just right. To do that, take it from interior designers: A light bulb’s temperature is key to creating a soft, warm ambiance, and 2700 Kelvin is the gold standard.

Kelvin vs. Lumens

As you’re considering which lightbulbs to add to your cart (clear, frosted, LED, perhaps?), you’ll want to keep two terms in mind: Kelvin and lumens. Kelvin (K) determines the color and mood of the light; the higher the number, the cooler the light. Lumens (lm), meanwhile, determine the brightness and intensity. The higher the lumens, the brighter the bulb. Just don’t mistake either for watts, which measure energy consumption.

Advertisement

2700 Kelvin is widely considered the ideal color temperature. It’s cozy and inviting and emulates the incandescent bulbs of yesteryear. Lightbulbs with a 2700 Kelvin rating are often labeled warm white; if you find their yellowish hue off-putting, opt for 3000 Kelvin bulbs for a softer white light. Some designers advise against going above 3000 Kelvin inside the home but make exceptions for workspaces such as garages, desks, or makeup vanities.

Related: How To Use the Rule of Three To Decorate Like an Interior Designer

For a more cohesive look throughout your home, consider using 2700 Kelvin bulbs in all your fixtures. Mixing light temperatures can have a jarring effect — just think about transitioning from a welcoming, warm-toned bedroom to a stark, cool-toned bathroom.

Advertisement

Now that you understand Kelvins, here’s a brief overview of lumens and how to choose the right brightness for your space:

• Low lumens (450 lm to 800 lm) provide soft light best suited for ambient lighting sources, such as table lamps.

• Moderate lumens (1000 lm to 1600 lm) are commonly used for general lighting, such as ceiling fixtures. They provide sufficient brightness for everyday use.

• High lumens (2000 lm and above) are best for task lighting, as they provide more illumination. Consider higher lumens for kitchens, workspaces, and outdoor floodlights.

The next time you visit your local hardware store and come face-to-face with a wall of boxed lightbulbs, you’ll be better prepared to select the best color temperature and brightness for your home’s ambiance.

Advertisement
Megan McCarty
Writer
Megan McCarty is a Los Angeles-based writer who covers the fun stuff: design, travel, wellness, beauty, and fashion. She has written for publications including Domino, The Spruce, MyDomaine, Bustle, and Rue Magazine. Her life rules include, but are not limited to, zipper when merging, contribute to your IRA, and do the nice thing.
This article is for general informational purposes only.
Affiliate Disclaimer 
|
Financial Disclaimer
Featured Image Credit:  Virojt Changyencham/ iStock | Updated  Sep 25, 2024 |
Advertisement
Food & Drink 3m read
0

A Simple Trick for Getting the Garlic Smell Off Your Hands

Garlic is an ingredient that’s loved by many — unless you’re a vampire or about to lean in for a kiss on a first date. But as much as garlic delights the taste buds, it also leaves behind a pungent and stubborn odor on the fingers. Most of the time, washing your hands with soap and water isn’t enough, and you’re left with no choice but to smell like garlic for a few hours (or longer). Fortunately, there’s a simple solution for getting the garlic smell off your hands. And you may recognize the person who popularized this trick.

All featured products and deals are selected independently and objectively by the author. House Outlook may receive a share of sales via affiliate links in content.

Garlic is an ingredient that’s loved by many — unless you’re a vampire or about to lean in for a kiss on a first date. But as much as garlic delights the taste buds, it also leaves behind a pungent and stubborn odor on the fingers. Most of the time, washing your hands with soap…

Martha Stewart to the Rescue

Credit where credit is due: The person we have to thank for bringing this ingenious hack to our attention is none other than celebrity homemaker Martha Stewart. The trick is simple, though it requires you to be extra careful as to not cut yourself. All you need is a source of warm, running water and a stainless steel knife.

Related: 9 Nutritious Nonperishable Foods To Stock for Emergencies

Head over to the sink and turn on the water so it’s warm and comfortable to touch. Then take the knife in one hand, place it under the water, and rub your garlic-smelling fingers against the dull side of the blade. After a few seconds, the potent garlic smell will dissipate and your hands will be left smelling fresh and clean.

Without getting too scientific, here’s a quick explanation of why it works: Garlic contains sulfur compounds that cling to your fingers and cause them to stink. Rubbing your fingers against stainless steel causes the metal to bind to these compounds and neutralizes the odor. This method is also effective for removing onion and fish smells.

Advertisement

Some Safer Alternatives

While Stewart’s method is by far the most popular, you don’t need to use a knife. In fact, any dull stainless steel kitchen implement will do. The duller it is, the less likely you are to cut yourself. Some reasonable alternatives include a stainless steel serving spoon or spatula. You can also rub your fingers against the sink itself, assuming it’s made of stainless steel.

Odor-Eliminating “Soap”

This sleek stainless steel “soap bar” is another (safer!) option for home cooks. It costs less than $6 — a small price to pay to easily get the garlic smell off of your hands. Keep this bar next to your sink and rub it on your hands under running water after cooking with garlic to banish the smell before it starts to linger.

Advertisement
Bennett Kleinman
Staff Writer
Bennett Kleinman is a New York City-based staff writer for Optimism Media, covering topics for several brands including House Outlook and Better Report. He previously contributed to television programs such as "Late Show With David Letterman" and "Impractical Jokers," and digital publications like The Onion. Bennett is also a devoted New York Yankees and New Jersey Devils fan, and thinks plain seltzer is the best drink ever invented.
This article is for general informational purposes only.
Affiliate Disclaimer 
|
Financial Disclaimer
Featured Image Credit:  Oleksandr Matsibura/ Shutterstock | Updated  Sep 25, 2024 |
Advertisement
Cleaning 4m read
0

5 Essential Tips for Cleaning Smarter, Not Harder

For many of us, cleaning is one of the last things we want to check off of our to-do lists. Dishes can pile up, dust can start collecting in corners, and bathrooms can easily fill with grime and scum. That’s why it’s necessary to clean what you can, when you can. But if it’s tough to keep up with a regular cleaning schedule and you’re not a tidy person by nature, there’s still hope. Keep these cleaning tips in your back pocket for those days when you’re feeling a little lazy (we’ve all been there).

All featured products and deals are selected independently and objectively by the author. House Outlook may receive a share of sales via affiliate links in content.

For many of us, cleaning is one of the last things we want to check off of our to-do lists. Dishes can pile up, dust can start collecting in corners, and bathrooms can easily fill with grime and scum. That’s why it’s necessary to clean what you can, when you can. But if it’s tough…

Store a Squeegee and Dish Wand in the Shower

If you want to multitask like a pro and make the most of your shower time, keep a squeegee and dish wand alongside your toiletries. Since you’re already in there, you can use a dish wand to scrub your tiles and bathtub while you shower. Opt for one with a handle that can be filled with soap or cleaner to give your shower tiles an even deeper clean.

Related: 3 Simple Hacks for Removing Stubborn Price Stickers

After you’re done showering, you can use a squeegee to wipe off excess water. Use the squeegee on the shower walls to fend off mold, and on glass shower doors to prevent soap scum or water stains. With this hack, not only do you get clean, but your shower does, too. All you have to do is keep these two handy cleaning tools close by.

Credit: SERSOLL/ Shutterstock

Put Your Dishwasher Utensil Holder in the Sink

Instead of letting dirty utensils pile up in the sink before putting them in the dishwasher, try this one easy hack that will keep them organized from the start. Take the silverware basket from your dishwasher and put it in your sink. As you use utensils, you can organize them into each compartment and place the holder back in the dishwasher when you’re ready to run it. This trick works best for those with generously sized kitchen sinks, and we do recommend using a sink protector to prevent the utensil holder from scratching the surface.

Credit: Olena Ivanova/ iStock
Advertisement

Soak Dirty Dishes

Does anyone actually enjoy hand-washing dishes, especially ones with heavy-duty residue or caked-on food? It’s time-consuming and, quite frankly, tough work. However, you can lighten your load by soaking dirty dishes before cleaning them. Fill up your sink or a dish bin with hot water and some dish soap, and let those pots and pans soak while you shower, clean other parts of the house, eat dinner, and more. After soaking for at least 15 to 30 minutes, stuck-on food will come off with ease.

Credit: Bowonpat Sakaew/ Shutterstock

Use Scrub- and Rinse-Free Cleaners

Half the battle of cleaning is all the scrubbing that’s required, oftentimes while you’re bent over the bathtub or straining your neck to clean shower ceilings or shower heads. But you can make quick work of cleaning your bathroom by upgrading the cleaning products you use. For showers, there are rinse-free solutions that melt away and prevent soap scum. There’s no wiping needed; just spray after you shower and go! There are also foaming bathroom cleaners that don’t require vigorous scrubbing and need only a quick wipe after letting the foam sit for a few minutes, which can make cleaning less of a workout.

Related: Keep Your Ceiling Fan Dust-Free With This Easy Trick
Credit: Varvara Kalashnikova/ iStock
Advertisement

Get a Robot Vacuum

If vacuuming isn’t your favorite task on your chore list, there’s still a way to clean your floors and get those hard-to-reach dust bunnies. A robot vacuum is the ultimate lazy cleaning hack that will do all the work for you. Instead of moving furniture to get rid of dust and debris under sofas, tables, beds, and chairs, you can turn on a robot vacuum and let it breeze through those tough spots on its own. Many robot vacuums also have advanced features, such as smart sensors and automatic charging, and can be controlled through an app, so you can schedule cleanings, target certain rooms or areas, and more. Although robot vacuums are an investment, they’re worth the purchase if you want to set it, forget it, and come home to sparkling clean floors.

Credit: perfectlab/ Shutterstock
Advertisement
Pauline Lacsamana
Writer
Pauline Lacsamana is a freelance writer and editor who specializes in commerce, home, design, and lifestyle. She has bylines in The Spruce, Business Insider, U.S. News & World Report, Hunker, MyDomaine, Parade, and more.
This article is for general informational purposes only.
Affiliate Disclaimer 
|
Financial Disclaimer
Featured Image Credit:  Hirurg/ iStock | Updated  Sep 25, 2024 |