Advertisement
Home Improvement 3m read
0

Dealing With a Stuck Zipper? The Solution Might Be in Your Pocket

Picture this: You’re on your way out the door, but the zipper on your wool chore coat won’t budge. You can’t imagine ever finding a suitable replacement — it’s vintage Hudson’s Bay, after all. Before you toss it in the donation pile or drop it off at the sewist, there’s a quick and easy fix you have to try. And the key to solving your zipper problem might be right in your pocket. All you need is a bit of lip balm. Here’s what to do:

All featured products and deals are selected independently and objectively by the author. House Outlook may receive a share of sales via affiliate links in content.

Picture this: You’re on your way out the door, but the zipper on your wool chore coat won’t budge. You can’t imagine ever finding a suitable replacement — it’s vintage Hudson’s Bay, after all. Before you toss it in the donation pile or drop it off at the sewist, there’s a quick and easy fix…

Step 1: Inspect the zipper for any fabric caught in the teeth. If you find any, make sure you have a firm grip on the fabric (you may want to use tweezers for this part), and pull it away from the zipper as you zip in the opposite direction. If that doesn’t solve the problem, move on to the next step.

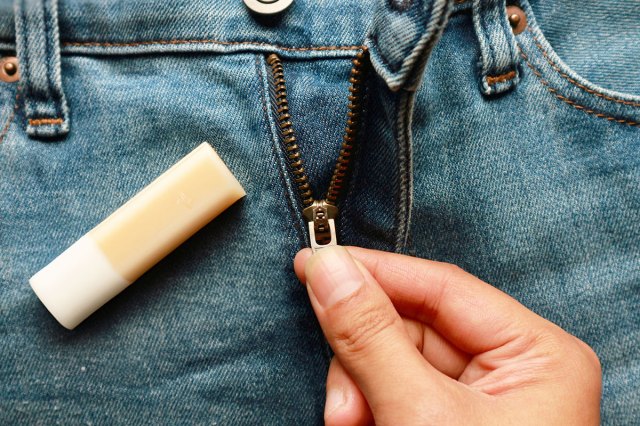
Step 2: Reach for a tube of lip balm (or even better, a jar of petroleum jelly) and apply the product to both sides of the zipper teeth, using your finger to rub it in. Grab the pull and tug it toward the snag. The lip balm will act as a lubricant and should release the stuck zipper easily.

If you don’t have any lip balm or petroleum jelly on hand, you can employ the same method using a graphite pencil, olive oil, wax paper, or solid deodorant instead. This hack also works wonders on zippers that are stubborn but not completely stuck. (Looking at you, zip-up ankle boots.)

Advertisement

So, the next time you encounter a stuck zipper on a purse, pair of jeans, or throw pillow cover, remember this helpful hack and avoid the frustration. It works in seconds and creates minimal mess, especially if you apply the lip balm with a cotton swab or detail paintbrush.

Bonus Hack

If, in an effort to fix a stuck zipper, you pull too hard and it splits apart, there’s a simple way to repair it. Locate the slider, the part just below the pull that joins or separates the teeth — most often, the problem is simply that it has opened too wide and needs reshaping. Guide the slider toward the middle of the zipper, if possible, to give yourself more room to work. Take a pair of needle-nose pliers and clamp them around the slider, squeezing it gently to narrow the opening. Voilà — your favorite weekender bag is saved.

Advertisement
Kelsey Morrison
Staff Editor
Kelsey Morrison is the Staff Editor of House Outlook. She has been covering all things home-related for over a decade, including real estate, interior design, commerce, and a slew of other lifestyle topics. Kelsey previously worked as a commerce editor for World of Good Brands (eHow.com and Cuteness.com) and as an associate editor for Livabl.com. She describes her personal design style as 1970s ski chalet-chic and has a thing for latch-hook tapestries.
This article is for general informational purposes only.
Affiliate Disclaimer 
|
Financial Disclaimer
Featured Image Credit:  Honeybee49/ Shutterstock | Updated  Sep 24, 2024 |
Advertisement
Gardening 3m read
0

Plant Parents, Don’t Toss Your Used Coffee Grounds

Many of us find it difficult to get going in the morning without a cup (or three) of coffee. As it turns out, your plants might also benefit from an occasional jolt of java. Using coffee grounds as houseplant fertilizer goes viral periodically, and in truth, they can provide valuable nutrients when used judiciously.

Many of us find it difficult to get going in the morning without a cup (or three) of coffee. As it turns out, your plants might also benefit from an occasional jolt of java. Using coffee grounds as houseplant fertilizer goes viral periodically, and in truth, they can provide valuable nutrients when used judiciously.

How To Use Coffee Grounds on Your Plants

The simplest way to put those grounds to use is by watering your houseplants with them. Here’s how it works: 

Step 1: Save the grounds from your coffee maker. If you use a pod-style coffee maker (Nespresso, Keurig, Tassimo, and similar systems), keep a container handy to collect the used pods. Drip coffee users can just use the contents of this morning’s filter.

Step 2: Empty the grounds into a pitcher or large measuring cup. If you’ve been saving pods, carefully cut them open and shake or scoop the grounds into your pitcher. Add room-temperature water to the grounds, and give them a stir to make a slurry of water and coffee. The consistency should be relatively thin as the goal is to dilute the coffee grounds as much as possible.

Step 3: Water your houseplants (or your garden) with the slurry, no more than once a week. It’s ready to use right away, but if you let the slurry rest for 20 to 30 minutes, the coffee’s nutrients have more time to dissolve into the water.

Advertisement

What Used Coffee Grounds Do for Plants

The slurry is essentially weak coffee, infused with nutrients and beneficial grounds. Brewed coffee is slightly acidic, and causes acid-loving plants such as African violets, cyclamens, begonias, Christmas cactus, and jade plants to perk right up. Avoid giving coffee grounds to plants that prefer alkaline soil as too much acidity can harm them. These include lavender, lilacs, roses, tomato plants, thyme, and rosemary.

If you have an outdoor garden, you can use your slurry there as well. Researchers at Oregon State University found that a coffee drench applied to garden beds deterred slugs, and noted that caffeine could actually kill the garden pests in specific concentrations. An article published by Washington State University further suggests that coffee can protect plants from common soil-borne infections, including fungal rots and wilts, and certain bacterial pathogens.

Advertisement
Fred Decker
Writer
Fred Decker is a trained chef and former restaurateur. Since closing his restaurants over a decade ago he has been a prolific freelance writer, publishing several thousand articles on dozens of high-volume websites including Taste Of Home, Hunker, Tasting Table, Week&, eHow, and GOBankingRates. He lives on a rural acreage shared with a big garden, chickens, rabbits, and grandkids.
This article is for general informational purposes only.
Affiliate Disclaimer 
|
Financial Disclaimer
Featured Image Credit:  Nor Gal/ Shutterstock | Updated  Sep 18, 2024 |
Advertisement
Gardening 3m read
0

Make an All-Natural Bug-Repellent Spray Using This Spice Rack Staple

Cinnamon is one of the handiest things to keep in your spice rack, and not just for its role in cooking and baking — though it’s certainly good for both. Whole sticks lend a sweet, spicy flavor to curries and mulled wine, while ground cinnamon is essential for desserts such as snickerdoodles and apple pie. If you’re from Cincinnati, you may even put cinnamon in chili.

All featured products and deals are selected independently and objectively by the author. House Outlook may receive a share of sales via affiliate links in content.

Cinnamon is one of the handiest things to keep in your spice rack, and not just for its role in cooking and baking — though it’s certainly good for both. Whole sticks lend a sweet, spicy flavor to curries and mulled wine, while ground cinnamon is essential for desserts such as snickerdoodles and apple pie.…

Now cinnamon’s surprising versatility has it going viral on social media for another reason: its use as a DIY natural insect repellent. Here’s how you can create a cinnamon-based bug spray to keep the creepie-crawlies at bay around your home.

Four-Ingredient Cinnamon Bug Spray

Making your own natural insect repellent is as easy as making yourself a cup of instant coffee. The recipe calls for just four ingredients: ground cinnamon, water, rubbing alcohol, and dish soap. Keep in mind that natural bug sprays tend to lose their potency fairly quickly, as their volatile oils evaporate, so only make as much as you plan to use within the next week or so.

Step 1: Using a ratio of 1 teaspoon of ground cinnamon for every pint of water — so, 2 teaspoons for a 4-cup batch, or 8 teaspoons for a half gallon — stir the ground cinnamon into warm water and let it steep for at least an hour. Then pour it through a fine-mesh strainer right into your spray bottle. If you’re worried about spilling, line a funnel with a paper towel or cheesecloth and use that to strain your concoction.

Step 2: Once the cinnamon and water mixture is in the bottle, add a quarter teaspoon each of rubbing alcohol and dish soap for every pint of water you’ve used (so a half teaspoon per quart, or 1 teaspoon for a half gallon).

Step 3: Mist the bug spray liberally around doorways and windows to repel ants, or in your closets to discourage spiders and earwigs. You can even spritz yourself to keep pesky mosquitoes away.

Advertisement

Is There Some Science Behind This? 

Unlike a lot of viral DIYs, this one is well supported by research. Cornell University’s Integrated Pest Management program hosts a 16-page paper outlining cinnamon’s capabilities as an insect repellent. The short version is that it’s safe for humans and our pets, and it genuinely does repel a lot of pests. (It’s even used in commercial agricultural products.) So mix up a batch, and start spraying.

Advertisement
Fred Decker
Writer
Fred Decker is a trained chef and former restaurateur. Since closing his restaurants over a decade ago he has been a prolific freelance writer, publishing several thousand articles on dozens of high-volume websites including Taste Of Home, Hunker, Tasting Table, Week&, eHow, and GOBankingRates. He lives on a rural acreage shared with a big garden, chickens, rabbits, and grandkids.
This article is for general informational purposes only.
Affiliate Disclaimer 
|
Financial Disclaimer
Featured Image Credit:  Svetlana Popova/ Shutterstock | Updated  Apr 24, 2025 |
Advertisement
Food & Drink 2m read
0

How To Slice Grapes and Cherry Tomatoes in Seconds Flat

There are myriad reasons to cut grapes or cherry tomatoes in half, the most notable for parents being to protect their little ones from choking. Even if you aren’t a parent of toddlers, though, you probably find yourself halving grapes, cherry tomatoes, or pitted olives when preparing all kinds of recipes, from Waldorf salad to pasta puttanesca.

There are myriad reasons to cut grapes or cherry tomatoes in half, the most notable for parents being to protect their little ones from choking. Even if you aren’t a parent of toddlers, though, you probably find yourself halving grapes, cherry tomatoes, or pitted olives when preparing all kinds of recipes, from Waldorf salad to…

It isn’t terribly difficult to chop these things in half one at a time, but why do that when you can get the job done easier — and quicker — with a hack? And when we say “quicker,” we mean in just a few seconds for a handful or two of fruit.

The trick is to use two plastic lids and a serrated knife, things you probably already have in your kitchen drawers. Place the cherry tomatoes (or whichever small round food item you want to slice) between two matching, flat-rimmed plastic lids. Think: Tupperware lids or the tops of tubs for cottage cheese, sour cream, or yogurt. Place the bottom lid rim-up, and the top lid rim-down to create a sandwich situation. Then press the top lid down lightly to keep the tomatoes in place, and slice through the fruit using the serrated knife.

Advertisement

If you don’t have any plastic lids, you can employ the same method using two plates, placing the bottom plate right side up and the top plate upside down. Plates with steep slopes will not work, however, since they cause uneven cuts and often leave little to no space for the knife to pass through. Plastic lids tend to work better overall, so rifle through the recycling bin if you must (but make sure the lids are clean before you put food between them).

This hack will save you time in the kitchen by allowing you to slice anywhere from 10 to 20 grapes or cherry tomatoes at once, depending on the size of the plastic lids or plates. Which means you can get to the fun part — eating — much sooner.

Advertisement
Jill Layton
Writer
Jill Layton started writing professionally when she realized her emails and texts were kinda funny. She’s an affiliate shopping writer and lifestyle contributor for Scary Mommy, Bustle, Mic, and Best Products. She’s the mom of two alarmingly witty kids and the world’s most perfect dog.
This article is for general informational purposes only.
Affiliate Disclaimer 
|
Financial Disclaimer
Featured Image Credit:  olepeshkina/ Shutterstock | Updated  Sep 16, 2024 |
Advertisement
Food & Drink 3m read
0

How To Soften Butter in Minutes (No Microwave Required)

Picture this: You volunteered to bring dessert to a potluck tonight, and you’re on the hook for two dozen chocolate chip cookies. Facing a race against the clock that makes you feel like you’re in an episode of The Great British Bake Off, you suddenly realize you forgot to soften the butter.

Picture this: You volunteered to bring dessert to a potluck tonight, and you’re on the hook for two dozen chocolate chip cookies. Facing a race against the clock that makes you feel like you’re in an episode of The Great British Bake Off, you suddenly realize you forgot to soften the butter.

Instead of popping it in the microwave, which often results in a melted, oily mess, try this time-saving hack to take your butter from cold to room temperature in just a few minutes. To start, boil some water (approximately 2 cups) in a kettle, or simply run the sink until the temperature of the water is very hot. The tap water should be almost too hot to touch, even for those with hardened, heat-tolerant mom hands.

Fill up a drinking glass with the hot water — if you’re using boiling water from a kettle, make sure the glass is resistant to thermal shock — and let it sit for five minutes. A pint glass or a Mason jar works especially well.

While that sits, grab a cutting board or another flat surface and place the stick of butter on it vertically. Once you’ve reached the five-minute mark, dump the hot water in the sink, and put the empty but still-warm glass upside down over the butter like a cloche, letting it rest for an additional five minutes. (If your butter is very cold and firm, you may need to leave it under the glass for up to 10 minutes.)

Advertisement

If you’re attempting to soften a larger block of butter, like the kind you can buy at Costco or Sam’s Club, you can use this same method with a larger vessel, such as a ceramic or glass bowl. It also helps to cut the butter into smaller pieces, increasing the amount of surface area exposed to the steam. 

Now let’s say you’re working with frozen butter — how can you get it up to room temperature when it’s essentially a block of ice? In that case, reach for a box grater and use the larger holes to grate the butter onto a sheet of waxed or parchment paper. Let it sit for five to 10 minutes, and it should be soft enough to mix into your cookie dough. Consider the potluck saved!

Advertisement
Kelsey Morrison
Staff Editor
Kelsey Morrison is the Staff Editor of House Outlook. She has been covering all things home-related for over a decade, including real estate, interior design, commerce, and a slew of other lifestyle topics. Kelsey previously worked as a commerce editor for World of Good Brands (eHow.com and Cuteness.com) and as an associate editor for Livabl.com. She describes her personal design style as 1970s ski chalet-chic and has a thing for latch-hook tapestries.
This article is for general informational purposes only.
Affiliate Disclaimer 
|
Financial Disclaimer
Featured Image Credit:  Arina P Habich/ Shutterstock | Updated  Feb 13, 2025 |
Advertisement
Food & Drink 3m read
0

3 Ways To Chill Wine Fast When You’re in a Pinch

Your friends are coming over for dinner in 30 minutes, and you just got home from the grocery store with a bottle of sauvignon blanc to pair with the pasta you’re whipping up. One problem: The wine is room temperature, not chilled between 45 and 50 degrees Fahrenheit as it should be. Don’t fret — there are several ways to chill a bottle of wine in 15 minutes or less. Use one of these three methods and you’ll be ready to offer your guests an aperitif as soon as they walk through the door.

All featured products and deals are selected independently and objectively by the author. House Outlook may receive a share of sales via affiliate links in content.

Your friends are coming over for dinner in 30 minutes, and you just got home from the grocery store with a bottle of sauvignon blanc to pair with the pasta you’re whipping up. One problem: The wine is room temperature, not chilled between 45 and 50 degrees Fahrenheit as it should be. Don’t fret —…

1. Salted Ice Water

Slipping Champagne into a briny ice bath will chill it to perfection in just 10 minutes. (In short, salt lowers the freezing point of water by disrupting the formation of ice crystals.) Grab an ice bucket — if you don’t own one, any bucket, cooler, or stock pot will do — and fill it up one-third of the way with lukewarm water. Using cold water will make it more difficult to dissolve the salt. We recommend using a measuring cup for this step as the amount of water will dictate the amount of salt needed; the correct ratio is 1 cup of salt for every gallon of water. Next, pour in the salt and stir the water vigorously to dissolve it. Fill up the rest of the bucket with ice. Place the wine bottle in the ice bucket, hold it by the neck, and spin or stir it every couple of minutes to chill evenly. In only 10 minutes, you’ll be ready to imbibe some bubbly.

Related: The Fix for Unpleasant Upholstery Odors Is in Your Liquor Cabinet

2. Wet Dish Towel

If you don’t have an ice bucket on hand, you can use a clean dish towel or a few paper towels to chill wine to its ideal temperature. Run the towel under the faucet to get it wet, gently wring it out to make sure it’s not dripping, and wrap it around the body of the bottle. Then pop the wrapped bottle in the freezer for 15 minutes, and your rosé will be cool enough to serve.

3. Gallon Freezer Bag

This method requires you to decant the wine into a much less aesthetically pleasing vessel, but it works. Use any large container, such as a mixing bowl or stock pot, and prepare an ice bath. Two parts ice to one part water usually does the trick. Now, this is the part you probably don’t want your guests to see: Pour the bottle of wine into a leakproof gallon-size freezer bag, seal it tightly, and gently lower it into the ice bath. Try to keep the seal above the water line to prevent any ice water from seeping in. Your bag of wine should chill completely within five minutes. Whether you serve the wine right out of the bag or return it to the bottle is entirely up to you (we won’t judge).

Advertisement
Kelsey Morrison
Staff Editor
Kelsey Morrison is the Staff Editor of House Outlook. She has been covering all things home-related for over a decade, including real estate, interior design, commerce, and a slew of other lifestyle topics. Kelsey previously worked as a commerce editor for World of Good Brands (eHow.com and Cuteness.com) and as an associate editor for Livabl.com. She describes her personal design style as 1970s ski chalet-chic and has a thing for latch-hook tapestries.
This article is for general informational purposes only.
Affiliate Disclaimer 
|
Financial Disclaimer
Featured Image Credit:  Duntonggi/ Shutterstock | Updated  Sep 23, 2024 |
Advertisement
Home Improvement 3m read
0

Remove Water Stains From Wood Furniture With This One Ingredient

No matter how many drink coasters you leave out for houseguests, you’re bound to end up with a few water stains on your wooden coffee table or nightstand. This typically occurs when moisture on the outside of the drinking glass is absorbed by the wood, leaving behind an unsightly ring.

All featured products and deals are selected independently and objectively by the author. House Outlook may receive a share of sales via affiliate links in content.

No matter how many drink coasters you leave out for houseguests, you’re bound to end up with a few water stains on your wooden coffee table or nightstand. This typically occurs when moisture on the outside of the drinking glass is absorbed by the wood, leaving behind an unsightly ring.

You might be tempted to just throw the damaged piece of furniture to the curb, but instead, try this easy fix for removing water stains. All you need is something you probably already have in your fridge: mayonnaise. Be sure to use real mayonnaise, though. Look for ingredients including oil, egg yolks, vinegar, and lemon — these work together to replace the moisture and dissolve the stain. 

To get started, apply some mayonnaise directly to the water stain and rub it in using a paper towel or a dish rag. Repeat this step, but this time, dab the mayonnaise onto the stain instead of rubbing it in. If you’re worried the condiment will attract pets or pests, you can always keep it covered with a paper towel.

Let the mayonnaise sit overnight, and in the morning, wipe it away with a clean cloth. You also should use a wood cleaner and conditioner (we like this plant-based formula by Method) to remove any residue. Note that the mayo method works best on surface-level stains, so if you notice rings on your table after a dinner party, you should address them sooner rather than later.

Advertisement

If you’re dealing with a sizable, months-old water mark — perhaps from a potted plant seeping moisture — consider sanding down the wood surface and applying a slurry made of Bar Keepers Friend and water to the stain. Let that sit for 45 minutes, wipe it off, and allow the raw wood to dry completely. Then, sand the entire surface a second time until the water rings have vanished, and apply your preferred wood stain.

With a little elbow grease, and perhaps a glob of mayonnaise, your wood furniture will soon look as good as new.

Advertisement
Kelsey Morrison
Staff Editor
Kelsey Morrison is the Staff Editor of House Outlook. She has been covering all things home-related for over a decade, including real estate, interior design, commerce, and a slew of other lifestyle topics. Kelsey previously worked as a commerce editor for World of Good Brands (eHow.com and Cuteness.com) and as an associate editor for Livabl.com. She describes her personal design style as 1970s ski chalet-chic and has a thing for latch-hook tapestries.
This article is for general informational purposes only.
Affiliate Disclaimer 
|
Financial Disclaimer
Featured Image Credit:  umaruchan4678/ iStock | Updated  Sep 16, 2024 |
Advertisement
Home Improvement 2m read
0

Fix Carpet Dents Overnight With This $0 Hack

Rearranging furniture can give your space a whole new look without you spending a dime. But if you have wall-to-wall carpet or a plush area rug, it can also reveal unsightly dents. Indentations happen when furniture or other heavy objects compress your carpet’s fibers for long periods of time. You probably won’t notice them if your furniture stays where it is, but once uncovered, they’re impossible to miss. Want to move the sofa? Dents. Does the coffee table look better at a different angle? Dents. Is it time to get rid of the piano? So many dents.

Rearranging furniture can give your space a whole new look without you spending a dime. But if you have wall-to-wall carpet or a plush area rug, it can also reveal unsightly dents. Indentations happen when furniture or other heavy objects compress your carpet’s fibers for long periods of time. You probably won’t notice them if…

The good news is that while carpet dents are eyesores, they don’t have to be permanent. In fact, there’s an easy way to get rid of them, and you don’t even need to purchase anything. The ice cubes in your freezer can melt away the dents in your carpet so it looks like they were never there. The process is quick and easy — when the ice cubes melt, water is absorbed by the carpet, allowing the fibers to regain their fullness.

Five Steps To Bring Dented Carpet Back to Life

1. Place the ice cubes directly onto the carpet divot, using one ice cube for a small dented area or several ice cubes for a larger area.

2. Allow the ice to melt naturally. This should take 90 minutes for small dents and up to three hours for large ones. You may need to add more ice depending on the temperature in the room and the depth of the dents.

3. Once the ice has melted, gently blot up the excess water using a paper towel, sponge, or napkin. Be sure not to press too hard or you might cause more damage.

4. Use the back of a spoon or a coin to fluff the flattened carpet fibers that need adjusting.

5. Let the area dry completely over a couple of hours, and then marvel at your handiwork.

The next time you spot a carpet dent, don’t stress. With a couple of ice cubes, those stubborn dents will be gone by morning. 

Advertisement
Jill Layton
Writer
Jill Layton started writing professionally when she realized her emails and texts were kinda funny. She’s an affiliate shopping writer and lifestyle contributor for Scary Mommy, Bustle, Mic, and Best Products. She’s the mom of two alarmingly witty kids and the world’s most perfect dog.
This article is for general informational purposes only.
Affiliate Disclaimer 
|
Financial Disclaimer
Featured Image Credit:  Sasima/ Shutterstock | Updated  Nov 13, 2024 |
Advertisement
Gardening 3m read
0

The Benefits of Spritzing Your Houseplants With Diluted Rubbing Alcohol

Rubbing alcohol is a versatile substance with many uses, including disinfecting wounds and deodorizing shoes, among other things. It’s also helpful in keeping houseplants happy and healthy. We know what you’re thinking: Wouldn’t a potent product like rubbing alcohol just cause plants to wilt and die? Surprisingly, the answer is no, so long as you use it properly. In fact, there are two distinct ways in which spraying rubbing alcohol on your houseplants can pay off in spades, so let’s take a look at both.

All featured products and deals are selected independently and objectively by the author. House Outlook may receive a share of sales via affiliate links in content.

Rubbing alcohol is a versatile substance with many uses, including disinfecting wounds and deodorizing shoes, among other things. It’s also helpful in keeping houseplants happy and healthy. We know what you’re thinking: Wouldn’t a potent product like rubbing alcohol just cause plants to wilt and die? Surprisingly, the answer is no, so long as you…

If you’re dealing with annoying aphids or malicious mealybugs crawling on your plants, rubbing alcohol is here to save the day. A well-balanced mix of rubbing alcohol and water can eliminate pests without harming the plant. First, get some rubbing alcohol that contains 70% alcohol or less. Then mix one part rubbing alcohol and 20 parts water inside a spray bottle, and you’re ready.

Before dousing the entire plant, we suggest conducting a spot test to make sure it won’t cause any harm. Find a single leaf, spray it, and wait 48 hours to see if you notice any damage. If the leaf is unaffected, you can proceed by spraying down any remaining areas where you see critters. While it may take a few attempts to eliminate all the bugs, it won’t be long until your houseplant is insect-free. Another option is to soak a cotton swab with rubbing alcohol and apply it directly to any pests you see.

Advertisement

Rubbing alcohol also works wonders when it comes to preserving your houseplants. In fact, a light spritz of rubbing alcohol can make your plants perk right up. Using a diluted solution of one part rubbing alcohol to 10-11 parts water, spray any foliage that looks like it’s beginning to wilt. This will help rehydrate the plant and restore some of its original vibrancy. The rubbing alcohol also can help preserve bulbs that are in bloom and keep them looking their best for longer.

Obviously, it’s still important to care for your plants as you normally would by providing them with enough fresh water and direct sunlight to keep them healthy. But a spritz of rubbing alcohol here and there can serve as a helpful aid in keeping those plants looking pristine and pest-free.

Advertisement
Bennett Kleinman
Staff Writer
Bennett Kleinman is a New York City-based staff writer for Optimism Media, covering topics for several brands including House Outlook and Better Report. He previously contributed to television programs such as "Late Show With David Letterman" and "Impractical Jokers," and digital publications like The Onion. Bennett is also a devoted New York Yankees and New Jersey Devils fan, and thinks plain seltzer is the best drink ever invented.
This article is for general informational purposes only.
Affiliate Disclaimer 
|
Financial Disclaimer
Featured Image Credit:  Unsplash+ via Getty Images | Updated  Feb 5, 2025 |
Advertisement
Organizing 3m read
0

Why You Should Have Two Different Laundry Hampers

Some people find doing the laundry to be relaxing, while others dread it with every fiber of their being. Unfortunately for those in the latter group, it’s an essential part of being an adult. It’s also a massive time suck, especially if you have a large family or are sweating through workout clothes several days a week. Thankfully, there are laundry hacks that can make the process much simpler and even give you back valuable free time. One of the most basic tricks has to do with your laundry hamper … or hampers. Owning two or more laundry hampers can be a game changer, and here’s why.

All featured products and deals are selected independently and objectively by the author. House Outlook may receive a share of sales via affiliate links in content.

Some people find doing the laundry to be relaxing, while others dread it with every fiber of their being. Unfortunately for those in the latter group, it’s an essential part of being an adult. It’s also a massive time suck, especially if you have a large family or are sweating through workout clothes several days…

For one thing, it cuts down on the time it takes to sort laundry that needs to be washed separately. If you have a dedicated hamper for each category right from the get-go, you can presort your clothes and linens and stop wasting valuable time separating everything on laundry day. We suggest having one hamper for whites and another for colors, or perhaps a dedicated hamper just for your delicates.

If sorting isn’t a concern, you can also use two hampers to prevent germs and bacteria from contaminating freshly washed garments. Think about it: Why throw your just-laundered clothing into the very same hamper that was full of dirty laundry an hour ago? Instead, keep one hamper in your bedroom to collect dirty clothing to carry to the laundry room, and then another in the laundry room itself to return the clean clothing. This can help ensure that your clean clothing doesn’t absorb any of the dirt and odors left behind.

Advertisement

Depending on your lifestyle, there may be other reasons to own multiple hampers. For example, if you work a physically demanding job and your clothes often get dirty, you might consider placing a dedicated hamper in the entryway so you don’t have to wear or carry soiled laundry further into the house. This is also a great tip if you have children who like to run around outside and get muddy. It may be worth putting a hamper in the laundry room for towels, too, especially if you wash those at a different frequency than the rest of your clothing.

Of course, the more laundry hampers you own, the more places there are for germs to fester. This is why it’s important to invest in hampers that are easy to clean. Plastic hampers are great for this reason, as you can easily wipe them down without damaging the material. There are also hampers that come with washable liners, so when laundry day rolls around, you can just remove the liner and wash it along with everything else.

Advertisement
Bennett Kleinman
Staff Writer
Bennett Kleinman is a New York City-based staff writer for Optimism Media, covering topics for several brands including House Outlook and Better Report. He previously contributed to television programs such as "Late Show With David Letterman" and "Impractical Jokers," and digital publications like The Onion. Bennett is also a devoted New York Yankees and New Jersey Devils fan, and thinks plain seltzer is the best drink ever invented.
This article is for general informational purposes only.
Affiliate Disclaimer 
|
Financial Disclaimer
Featured Image Credit:  Ron Lach/ Pexels | Updated  Sep 16, 2024 |